What is an object in JavaScript?
An object in JavaScript is something similar to a real-life object.
For example, an object can be your computer. It has various properties like color, screen size, and many methods (functionalities) like internet browsing. Computers can vary though, for example, they can have a different operating system, like macOS or Linux.
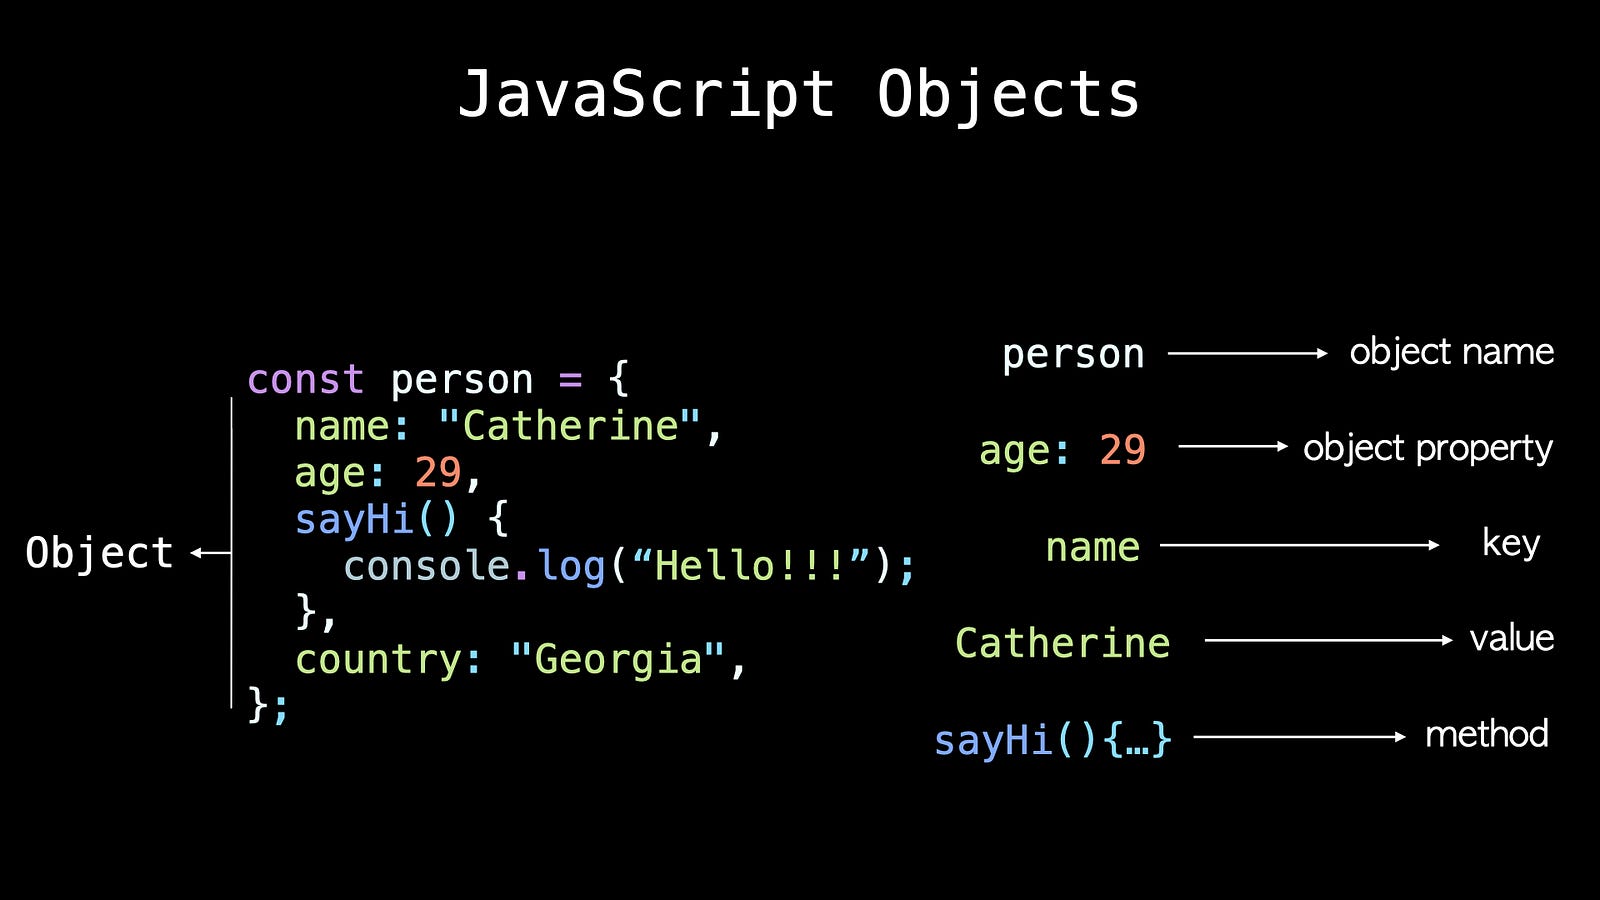
Just like other data types, objects can contain various values. The values are written in a key-value pair saved inside curly braces. These key-value pairs are called properties of objects. Functions which are also properties are called methods.
Properties
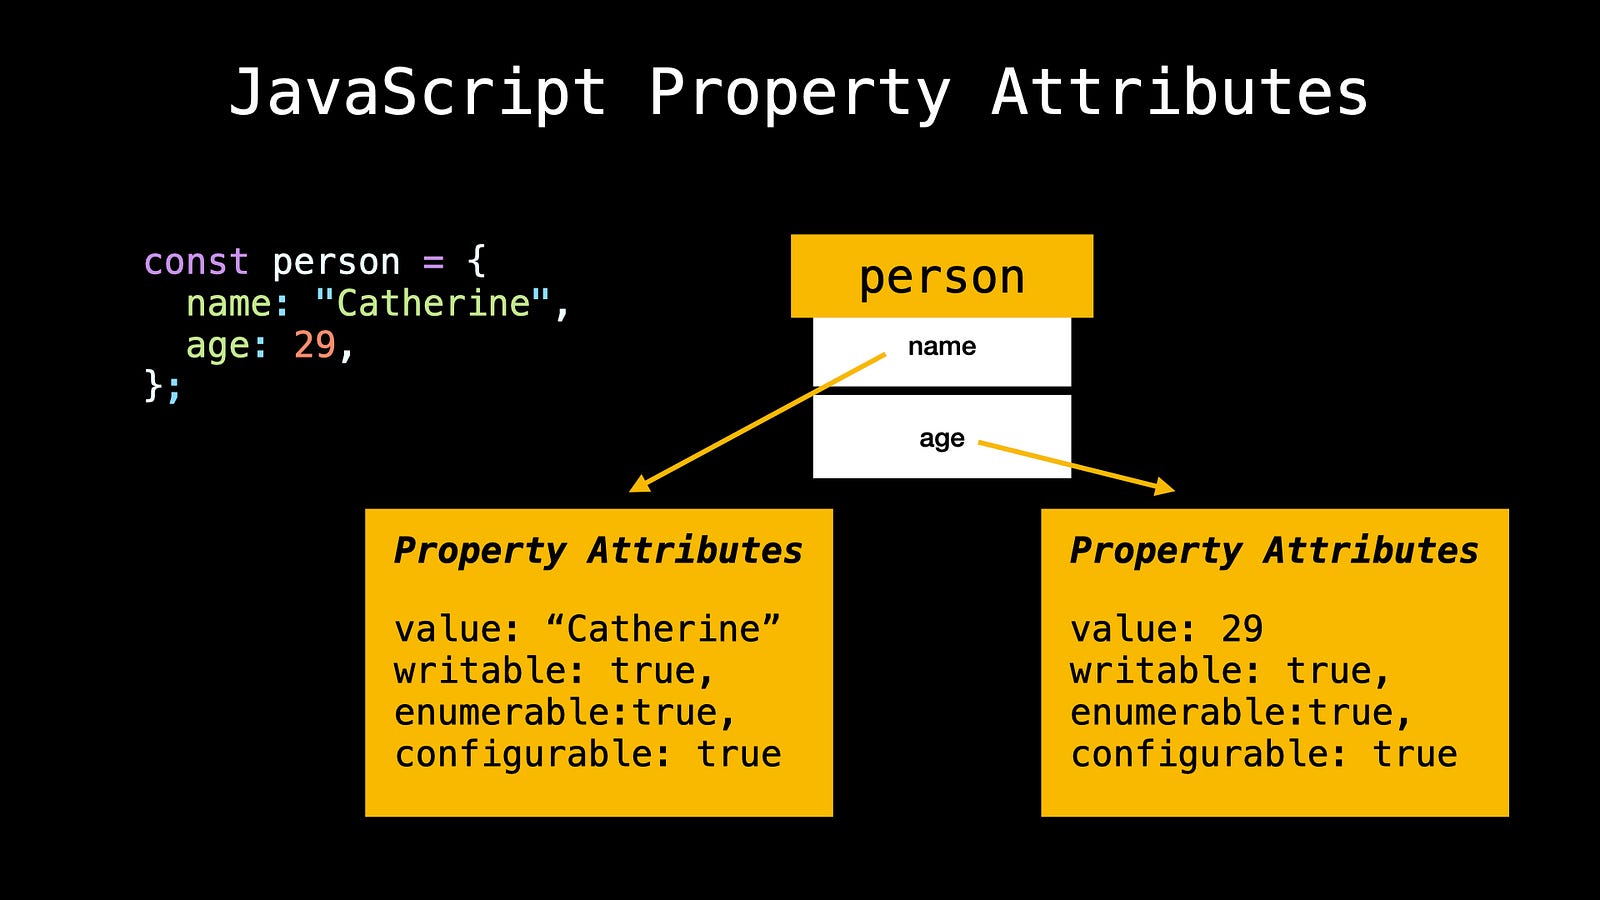
Properties are key-value pairs that exist inside an object. The objects consist of a collection of these various properties that you can add, delete or change (not all of them though). Properties are written in key-value pairs where a key is the property’s name and a value is one of the attributes containing the information about our key. Properties have other attributes besides the value which you don’t need much right now but it’s good to know. You can check them using Object.getOwnPropertyDescriptor(objectname, “key”).
Methods
Methods are properties of objects that hold a function. Functions are actions that can be performed on objects. Functions and methods seem very similar so I recommend you to read my post to understand the exact difference between them.
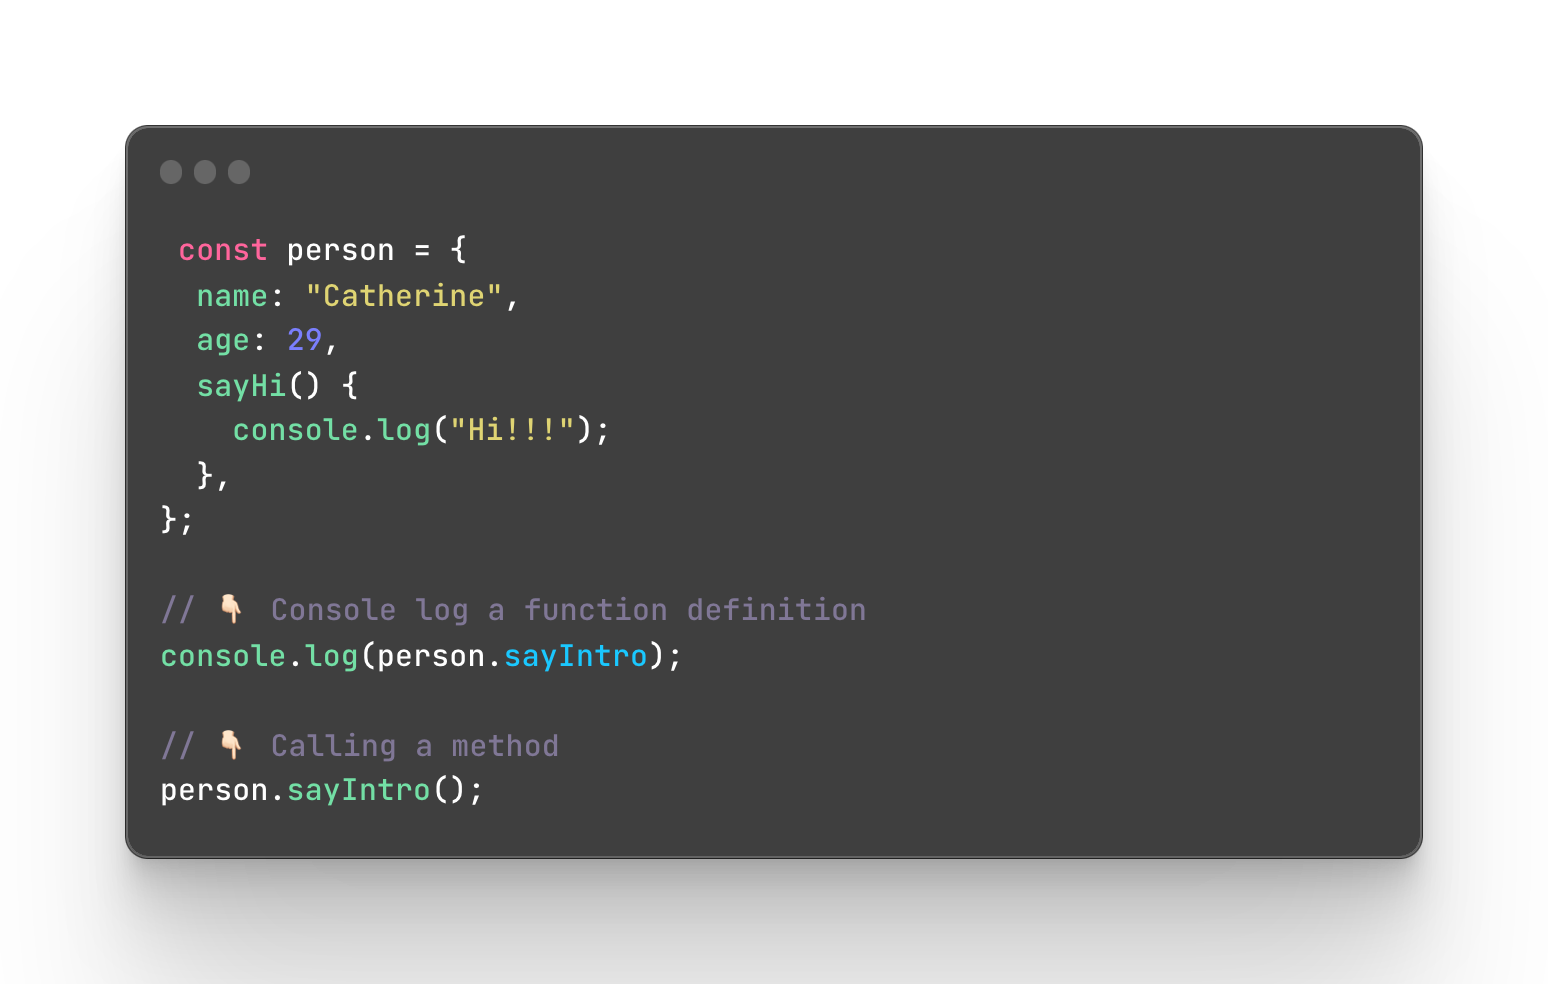
Note that when it comes to objects you can either use a function inside it as a method (call it) or you can use it as a property (not calling it). In order to call the method (make it perform the action) you need to use () and to use it as a property simply write it without ().
Prototypes
In JavaScript, objects are able to inherit features from one another with the help of prototypes and each of them has a property called prototype.
The prototype is an object itself so it also has its own prototype.
Objects have other built-in properties with various functionalities besides the ones that you can create yourself.
Let’s create a simple object to visualize the process.
I will create a simple person object that has a property of name with the value “Catherine” and a method sayHi that will console log a greeting when called.
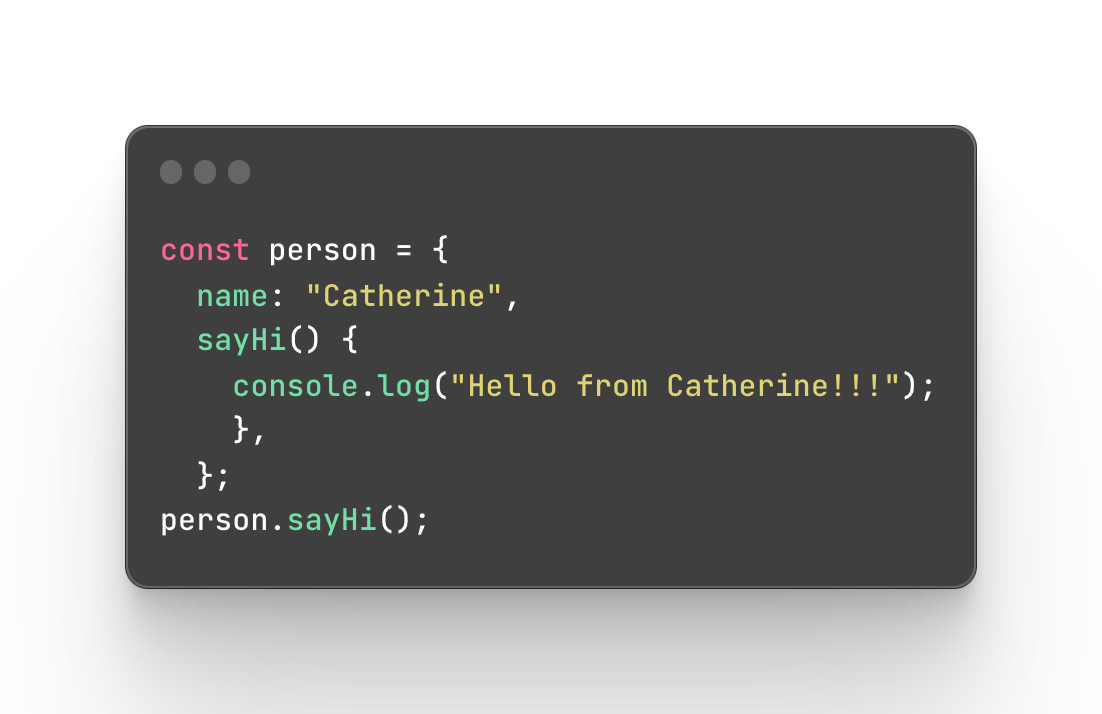
As you see, to check the property value or call a method you simply write the object name, dot, and the property you need.
In the browser’s console log you can try to write the same but after the dot don’t write anything just yet. What it will do is that the browser will suggest to you the existing properties. And these are the ones I mentioned earlier! The built-in properties along with the ones you created yourself.
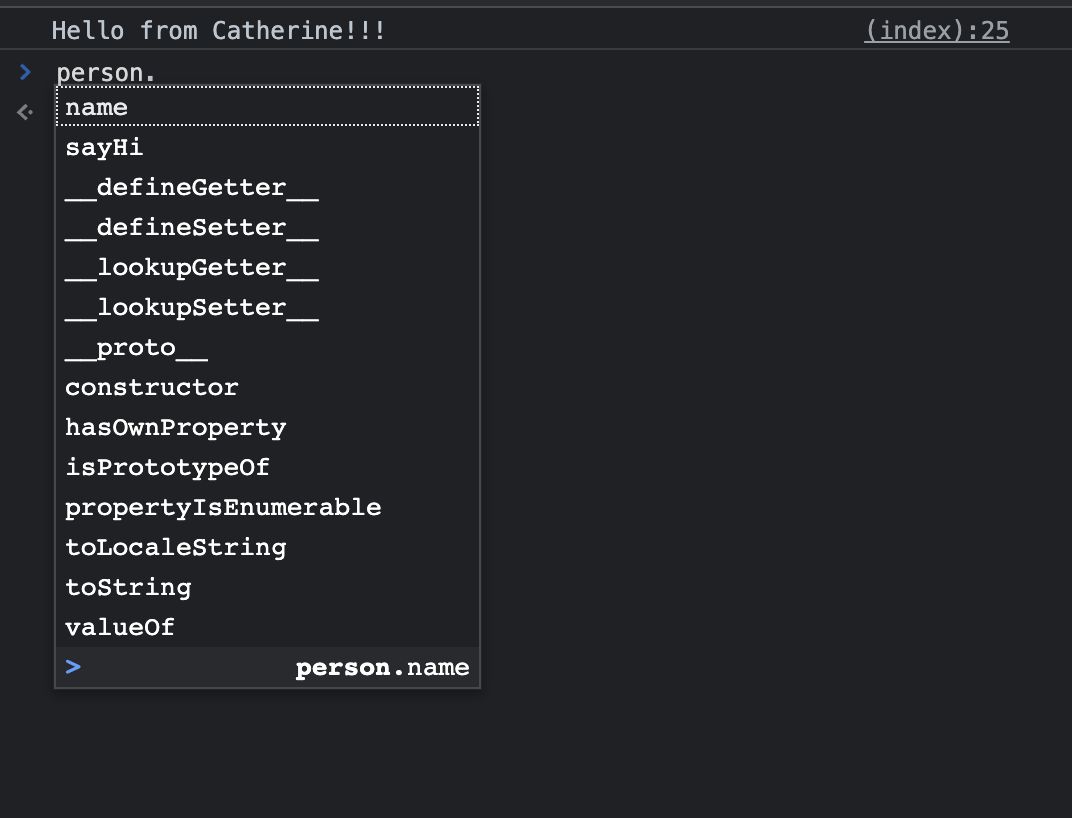
As you see in the list, we have various properties and one of them is sayHi that we created.
Now guess which one is the prototype property? It’s the one called proto, so yes, it’s not called exactly a prototype. On top of that, you can also find the prototype by doing so Object.getPrototypeOf(person). Both ways return the same result.
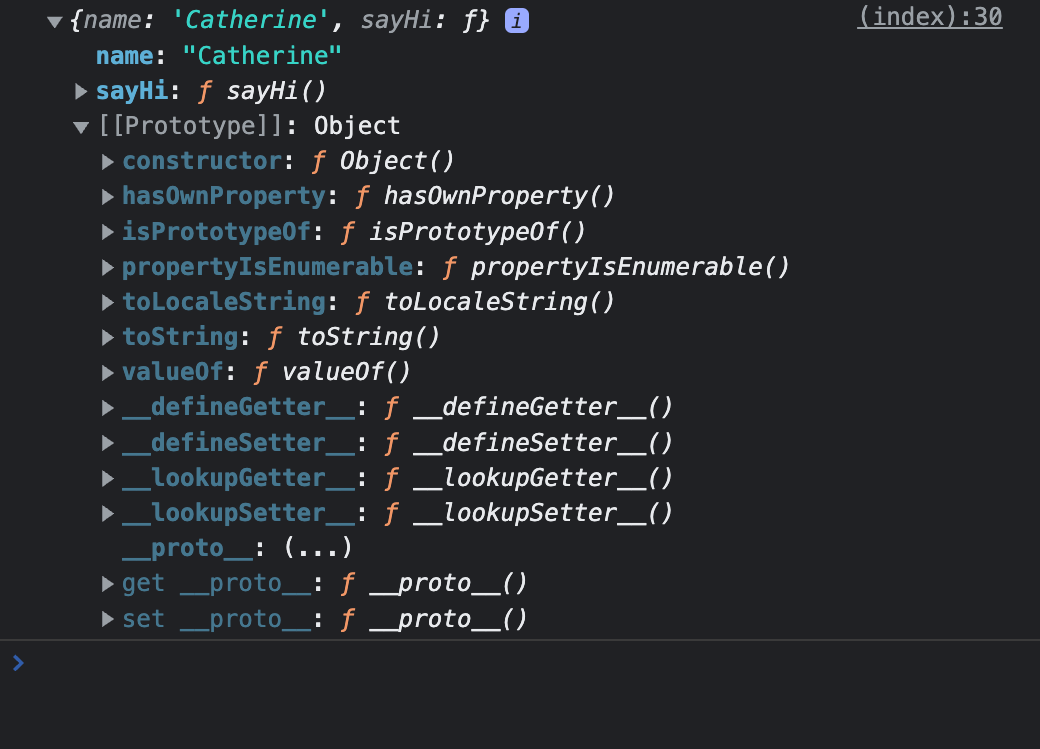
You can also console log the person object and when examining the object you will see a propriety of prototype written like [[Prototype]]: Object. This is the reference to the prototype object.

When you expand it, it will show you various properties of this prototype because the prototype is an object itself and has various properties.
Prototype chain
To remind you, objects have a property prototype which is also an object so it has its prototype property as well. This is called a prototype chain and it can end when a prototype’s prototype is null.
Here is how the prototype chain looks in the console.
By using the same object as previously, let’s console log the person object and as a result, this is what we see.
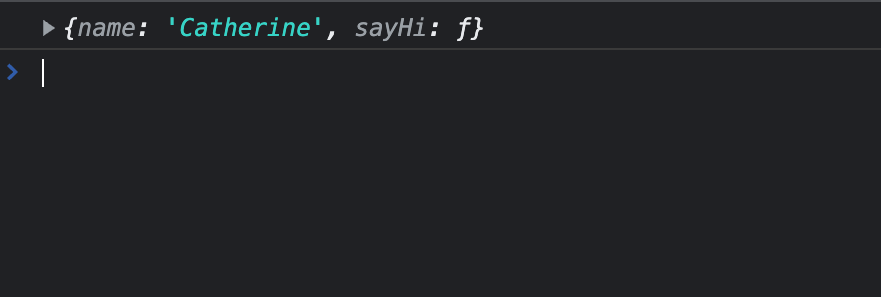
Expand the object person to see what we have here. You will notice the [[Prototype]] that is an object.

Once you expand it, you will see various built-in properties of the object.
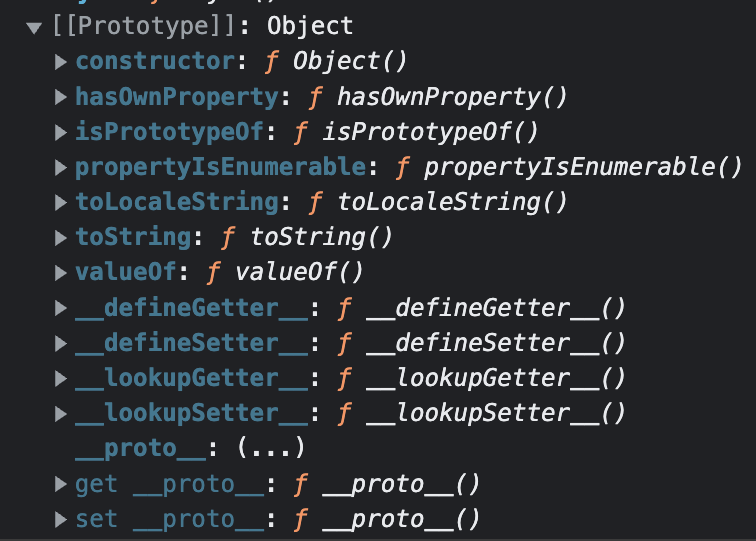
If you look down, at the end you will see a property proto that will direct us to the prototype. Click it and you will see built-in properties again.
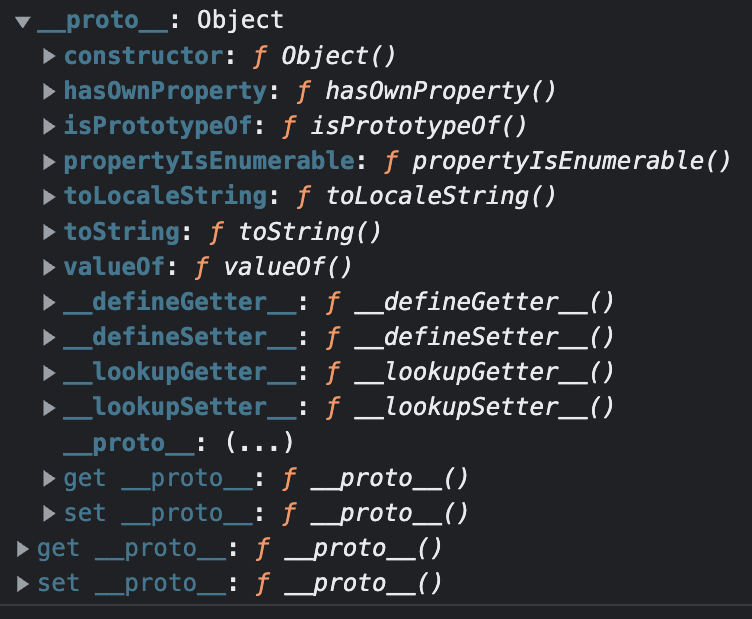
Then again you will see another proto of the proto. If you expand it again, this time it will show null because the prototype chain has ended.
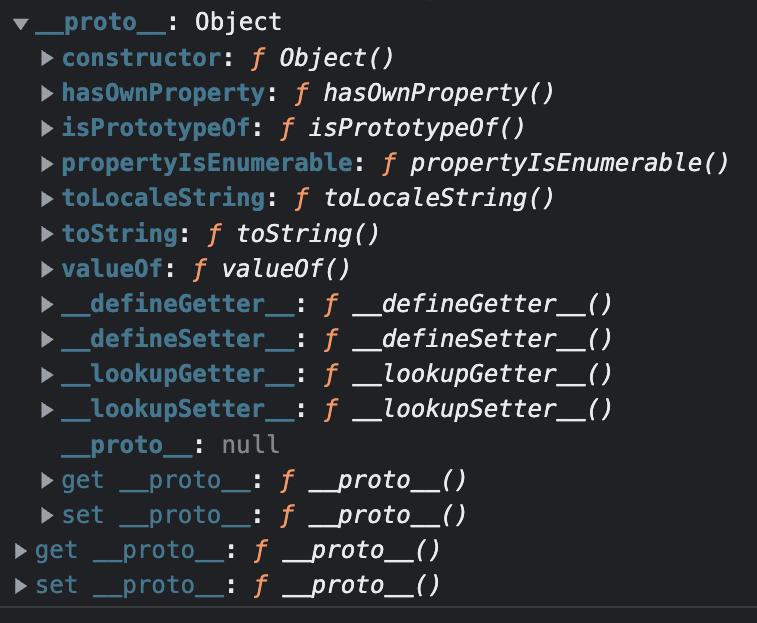
All this already exists in JavaScript by default but if you create objects and then construct more objects from the main object, you will get this type of chain.
I will get back to this in more detail but here is a quick example of what I mean and why the prototype chain is interesting.
Let’s keep using the same example of an object person but add some improvement. Please ignore the this keyword if you don’t know what it means, I will also get back to this later.
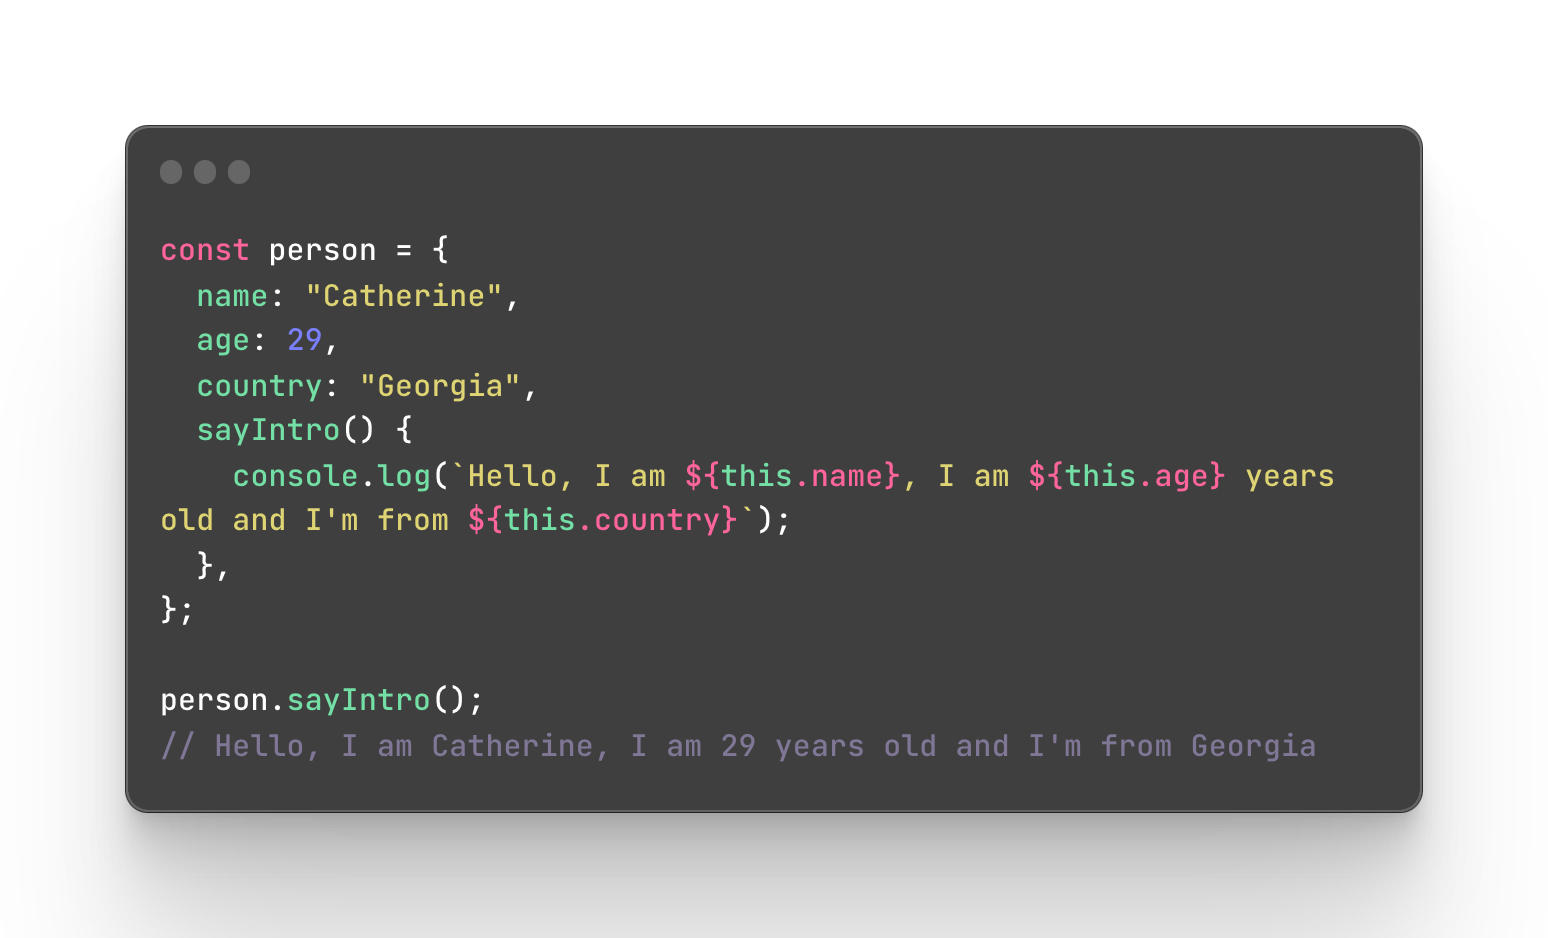
Imagine that this object person is the main object and we can create other objects from it while it will serve as a parent object. The name, age, country, and intro function we added to the person object will serve as default settings. To create a new object from the person object you can use Object.create().
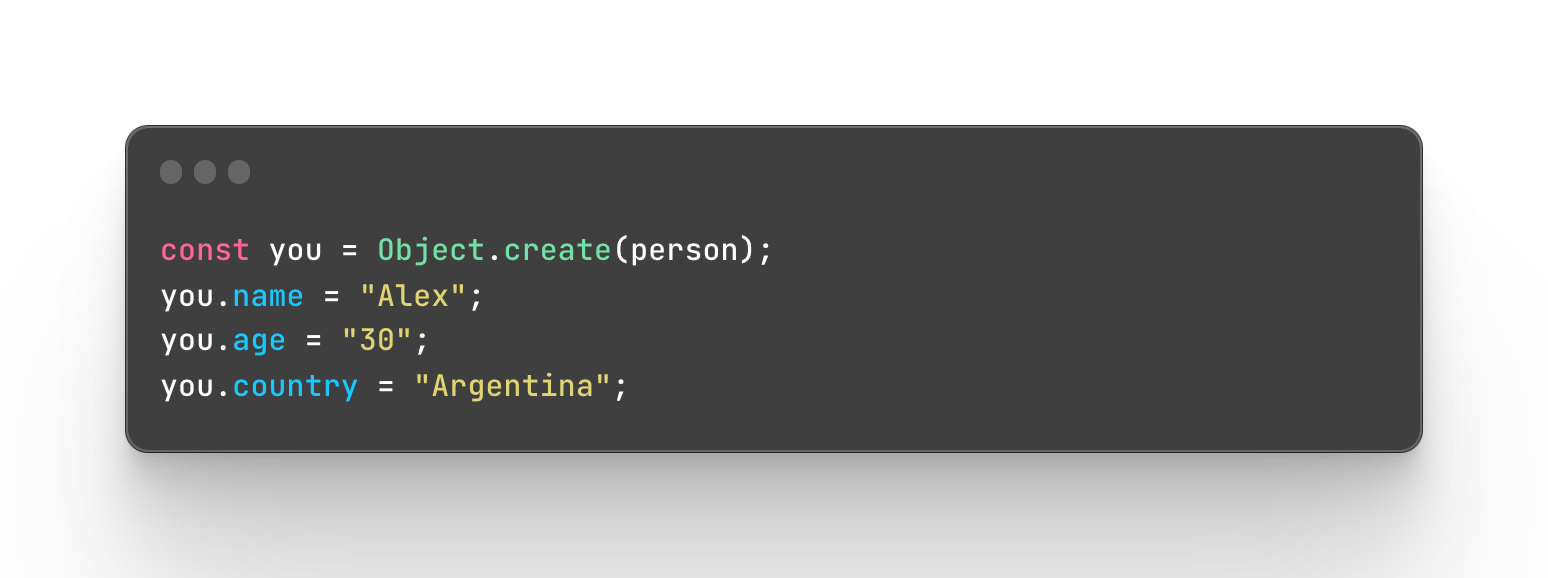
Once you copy the person object, you will change the existing properties like name, age, and country. If you don’t it will just stay the same but we want to create a new person, right?
Now here is the tricky question. If I don’t add the sayIntro function to this new YOU object, will I be able to console log the same thing as with the object person? I didn’t add this method to our new object so can I use something I didn’t even add?
Thanks to the prototype chain, yes you can.

Let’s inspect the object you and understand what’s going on.
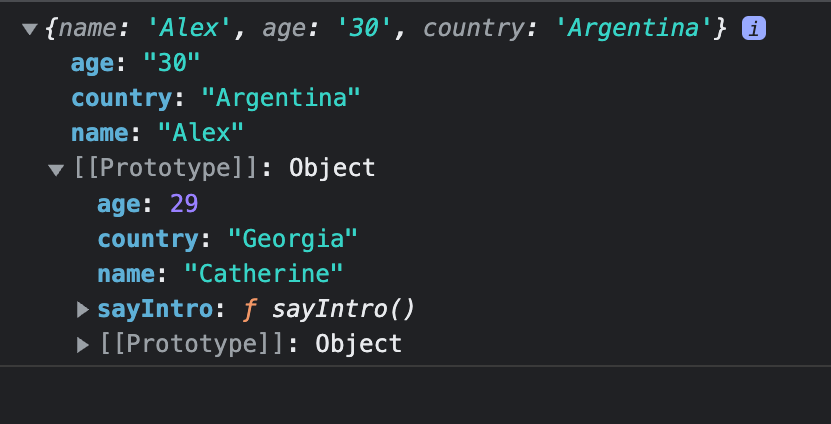
If you console log the object you and expand it, you will see the properties we have added like the name, age, and country. And of course, the prototype is always there when we have an object.

There is no sayIntro method available. But if you expand the prototype you will see all the properties of the person object, the one that we copied. So what happened is that the object you inherited everything from the parent object — the person. And that’s why we are able to use the sayIntro method, as it’s inserted from the main object.
Prototypal inheritance
Prototypal inheritance is a linking of a prototype between the child and parent objects. JavaScript already has a default object where built-in methods reside. But you can also create more parent-child objects. If you copy any object, it will inherit everything from its parent and it will be available inside the proto. This means that you don’t have to re-create the same method for every child as it will be inherited automatically.
How JavaScript is searching for a property
Imagine we are doing the same we did previously when searching for an object’s (person) property and called for sayHi. When we search for a property the first place where the search starts is the object itself. If nothing is found the search is not over and it moves to the prototype. If no property is found again the search continues to the prototype’s prototype. In the end, if nothing is found it returns undefined because nothing was found.
Constructor
A constructor is a regular function that we use in order to create an object from scratch or to be more accurate an instance of an object. Along with the instance you can add properties of your choice. Considering that JavaScript is a prototype-based language, constructors appeared much later and their main goal is the possibility for JavaScript to handle work as an object-based language.
In order to distinguish a regular function from the constructor there are some basic rules to follow:
#1 It’s important to start a function name with a capital letter.
#2 Constructors are not supposed to return any values but define properties.
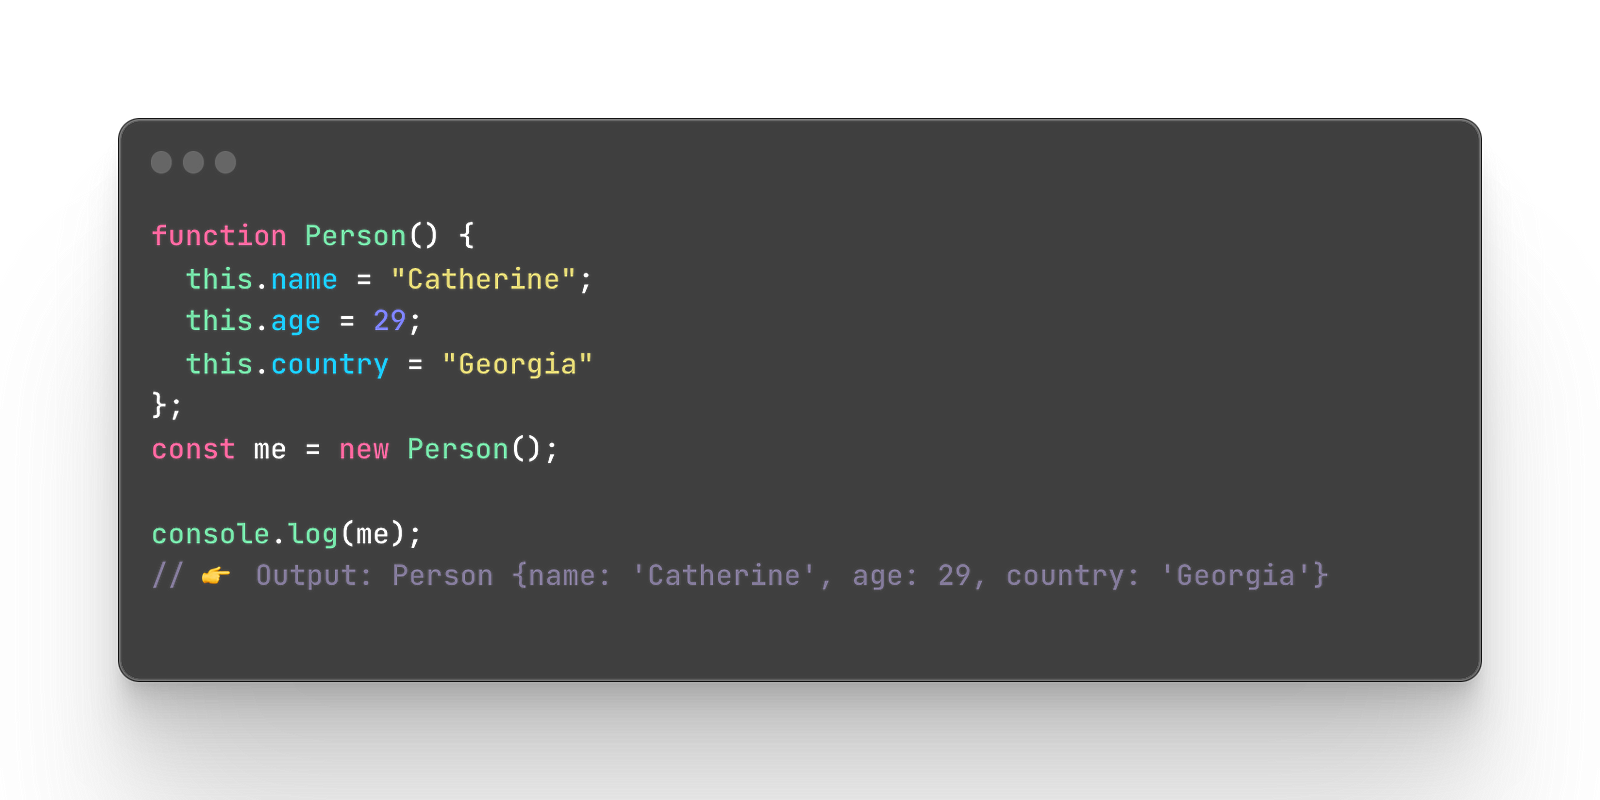
Remember that object person example? Let’s re-create the same object but in a more modern way with a constructor!
First, we will create an object with a constructor function with properties like name, age, and country. Then we will create a new instance of this object.
You can change or add properties as we did previously by separating the object name and key with a dot and adding a new value.
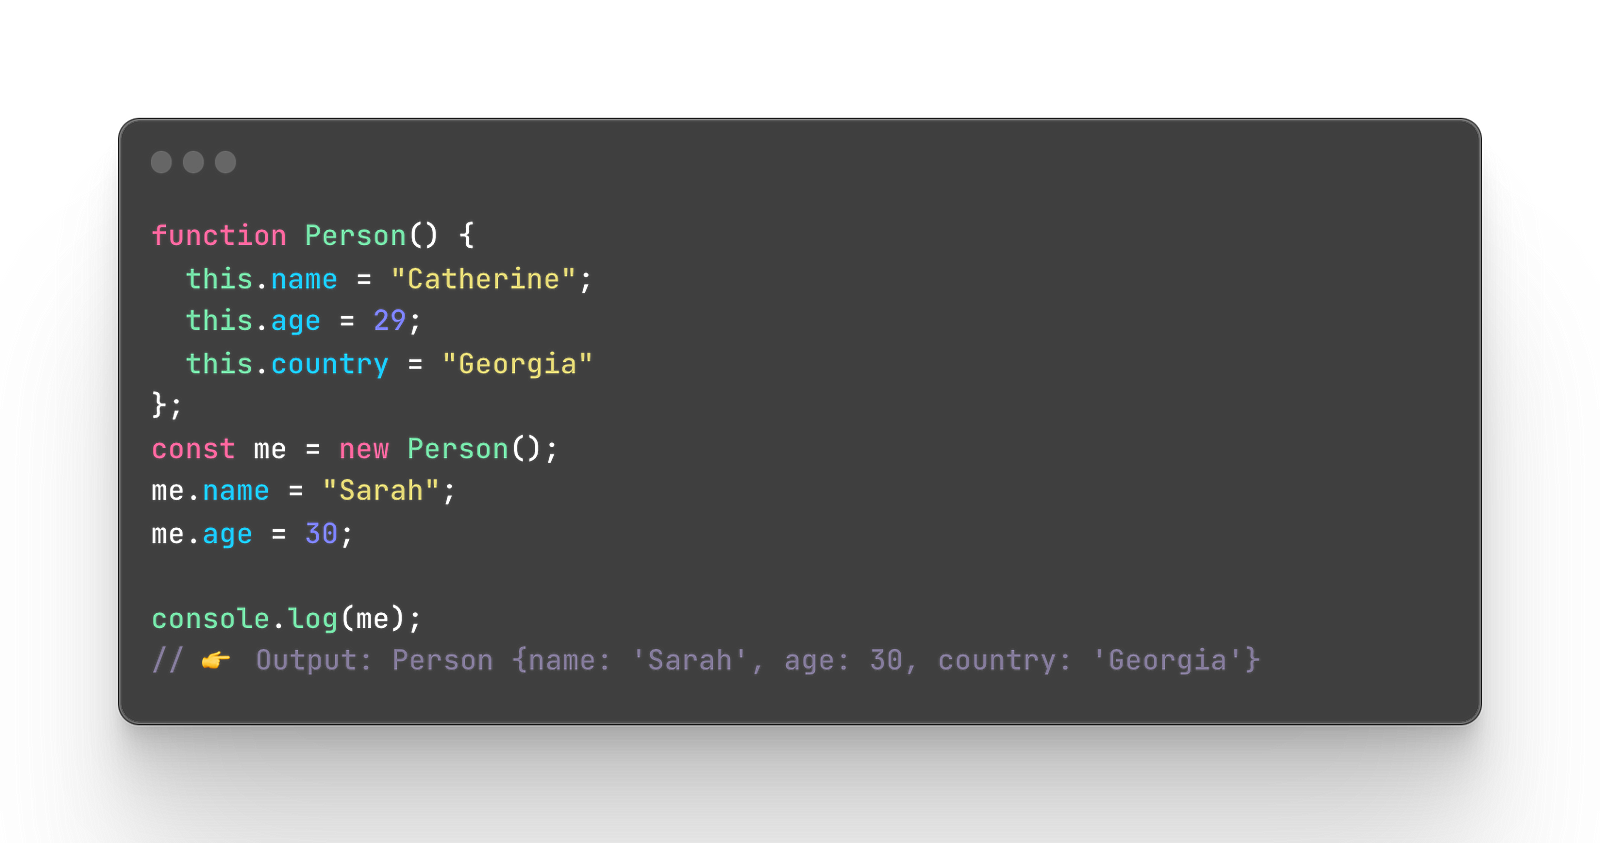
On the other hand, changing properties as above is not always a good decision because what if you have an object with tons of various properties? It would take a lot of time to manually add it.
What if you created an object of a user with a username and email, for instance? Every time someone registers you are not going to manually write every detail. Or what if I have 20 or 30 various fields of information? That’s why, we can extend a constructor and add some arguments to the function.
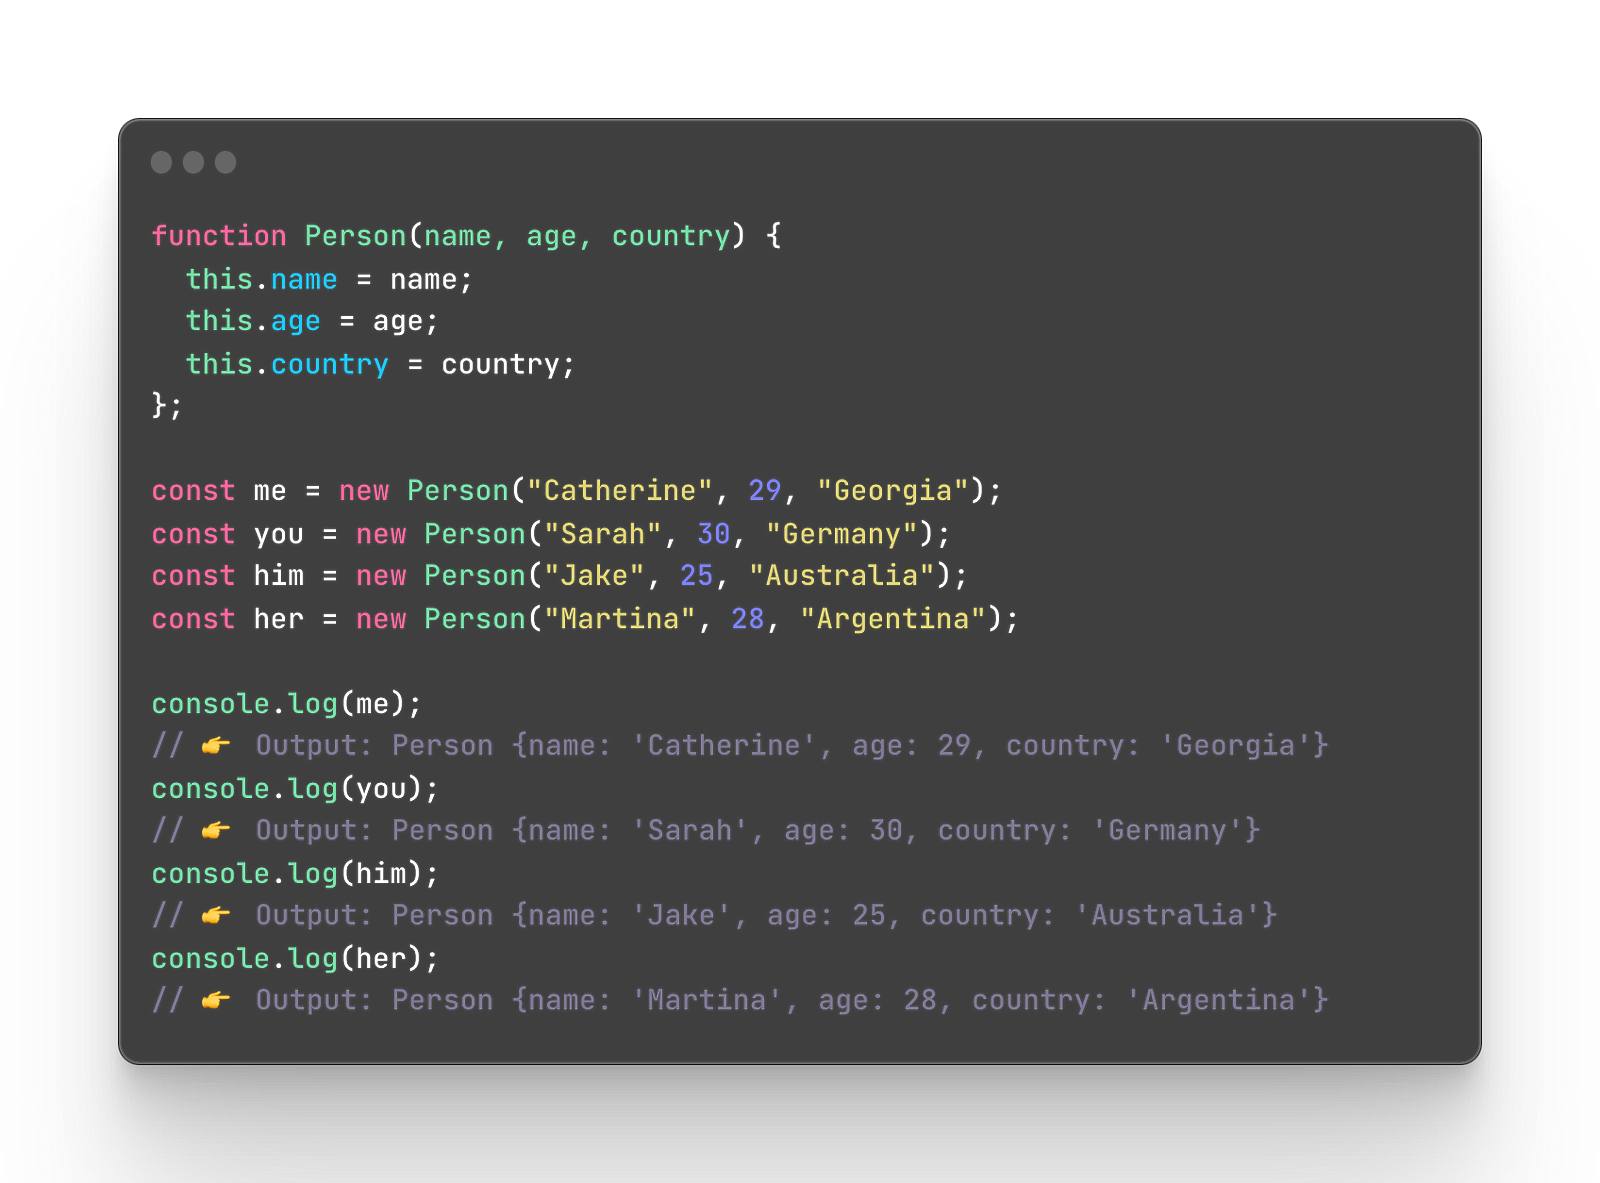
Arguments are values that we pass to the function. I am going to re-create this code one more time but with arguments this time.
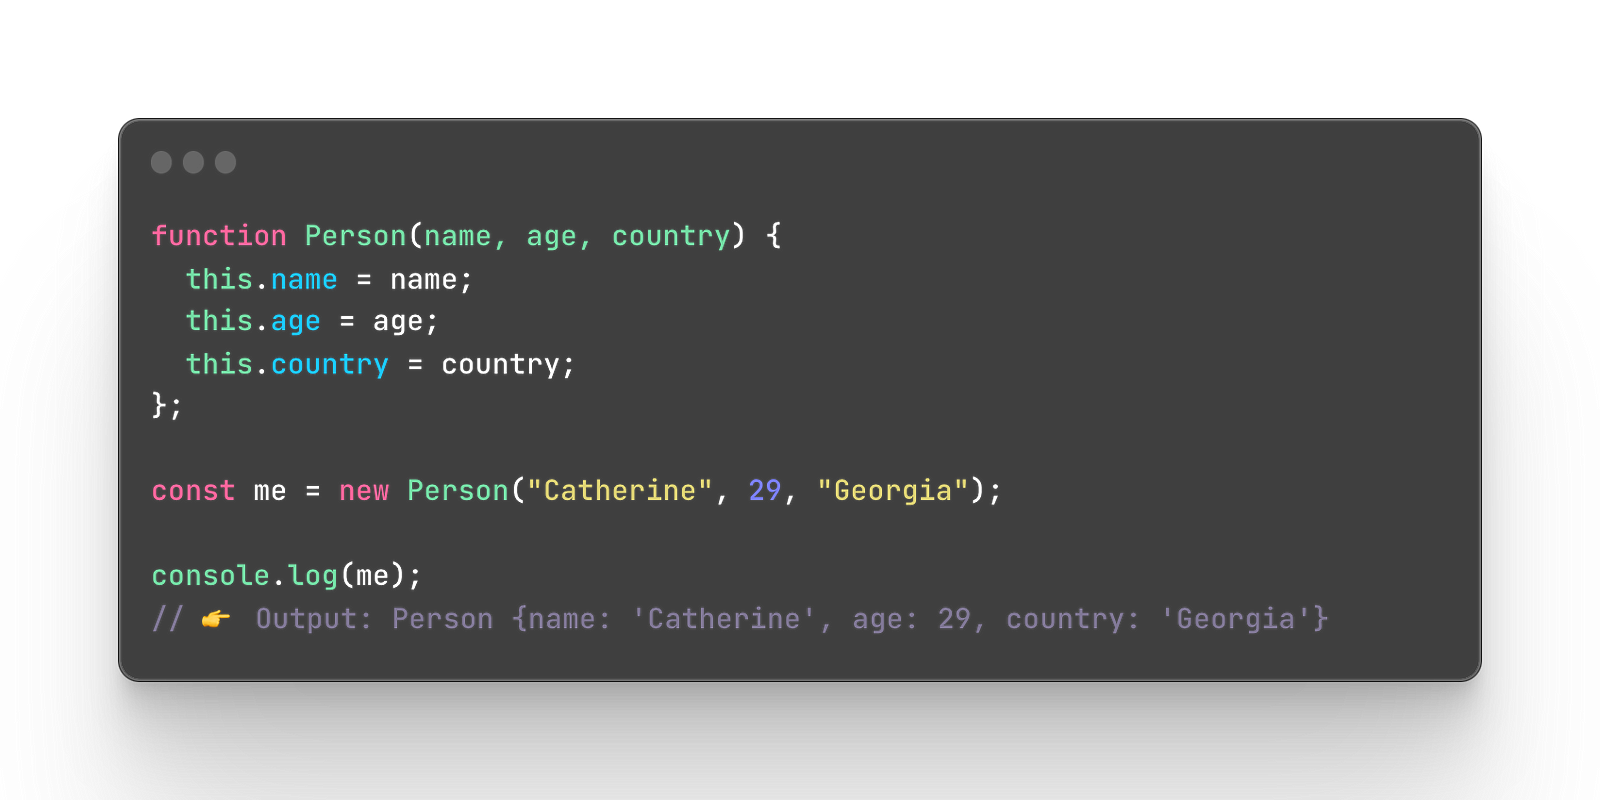
Looks so much shorter, faster, and nicer! Let’s understand what is going on here.
In the function Person, I added parameters like name, age, and country but they are not actual values just yet. Parameters are like empty boxes waiting to receive a value. When I start creating an instance of the ME, I also pass arguments to the function but this time with specific values. The constructor function will receive this information and create a new object with these specific values! Now you can simply use this constructor and pass values of newly registered users instead of manually adding each piece of information.
The this keyword
This is one of the hardest concepts to understand especially when you have no technical background whatsoever. And it’s also hard to figure out the best time to start learning it. I recommend you to come back to this once you finish the article and re-read the article once you read about the this keyword.
The this is not a variable and it’s called a keyword that cannot be altered or changed in any way. It’s hard to understand or explain it because it changes its value depending on where and how we use it. The most basic explanation would be that the this keyword refers to the object depending on how and in which object it is used in.
The this in a method
If you have read through, you noticed that I have already used the this keyword in an object’s method. When we use this in an object’s method, it refers to this object (where the method is located).
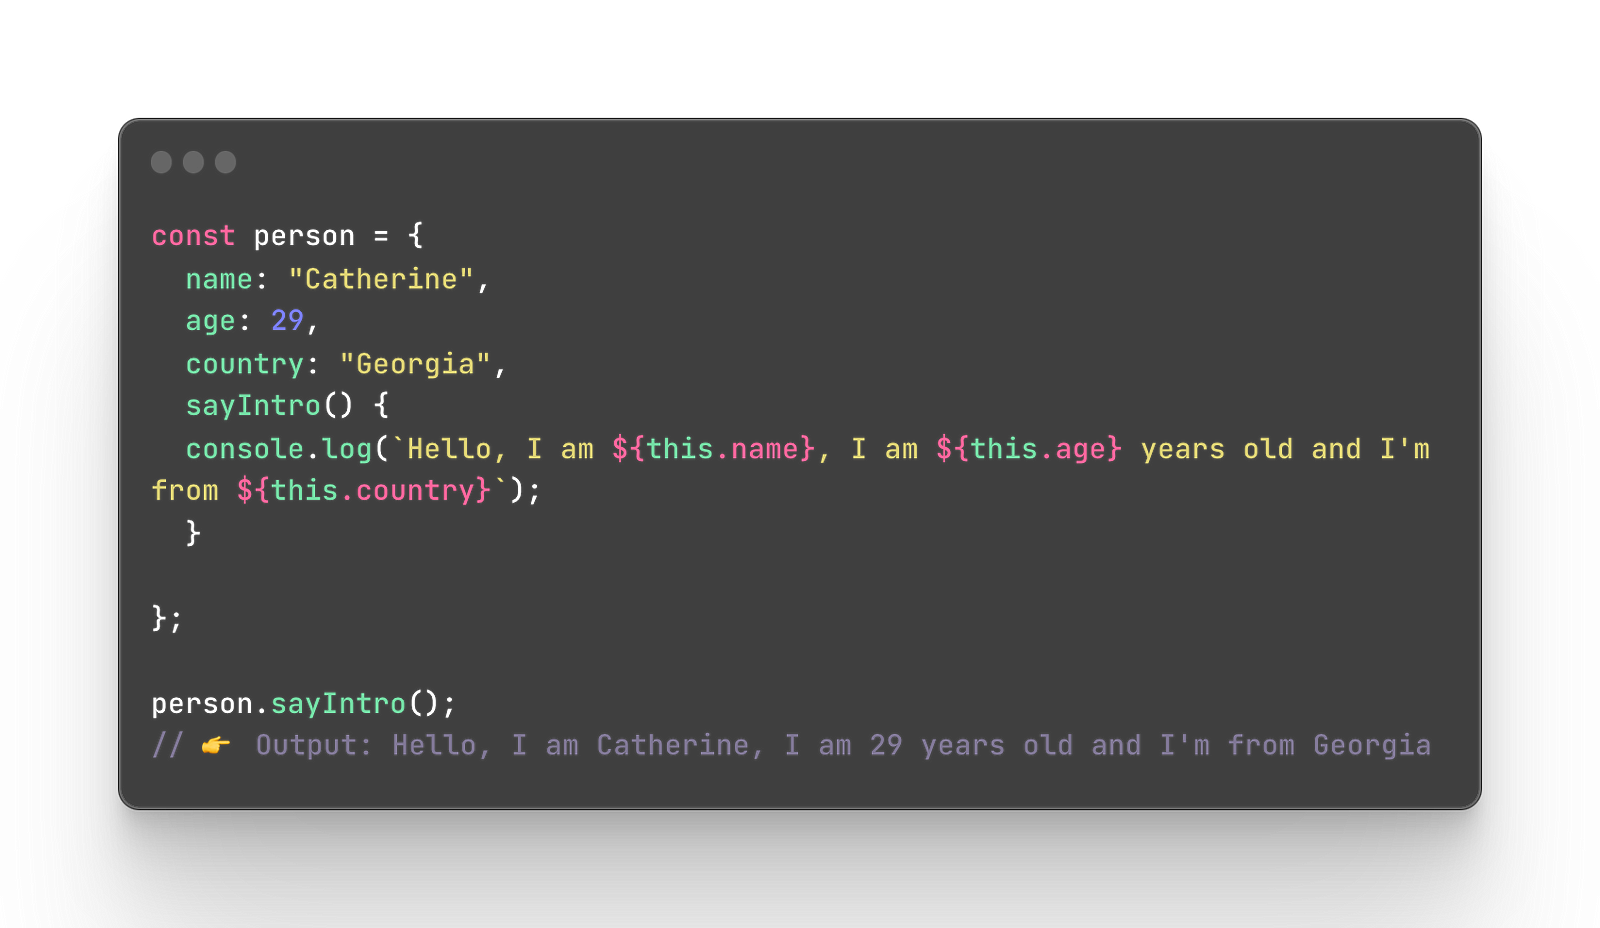
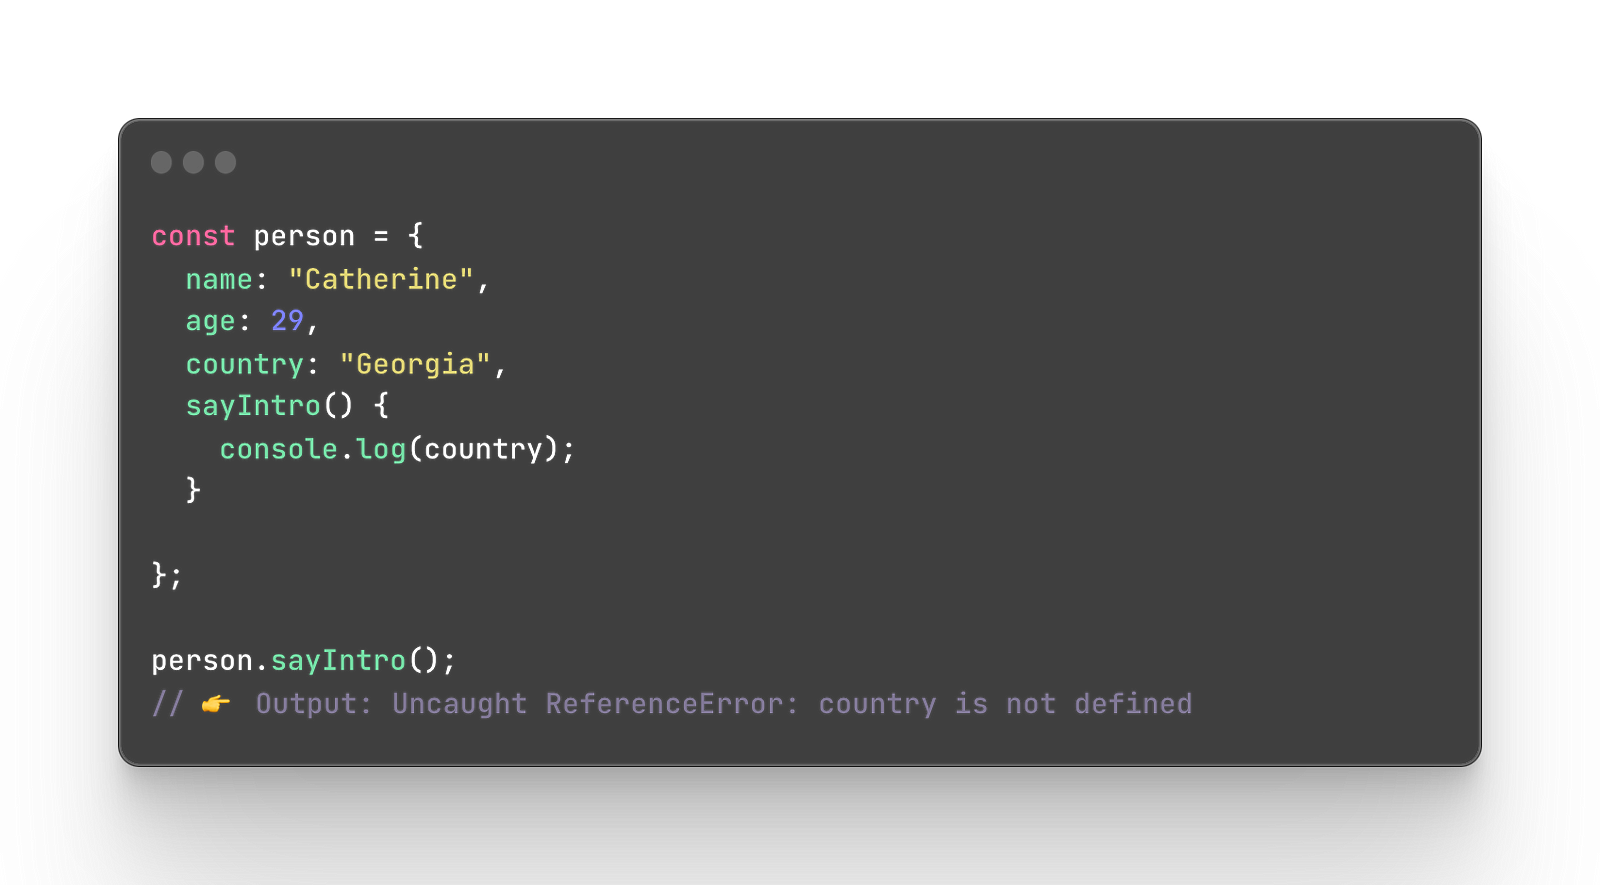
If we don’t specify where this method is getting the value from and it’s not located inside the method, it will simply throw an error of undefined.
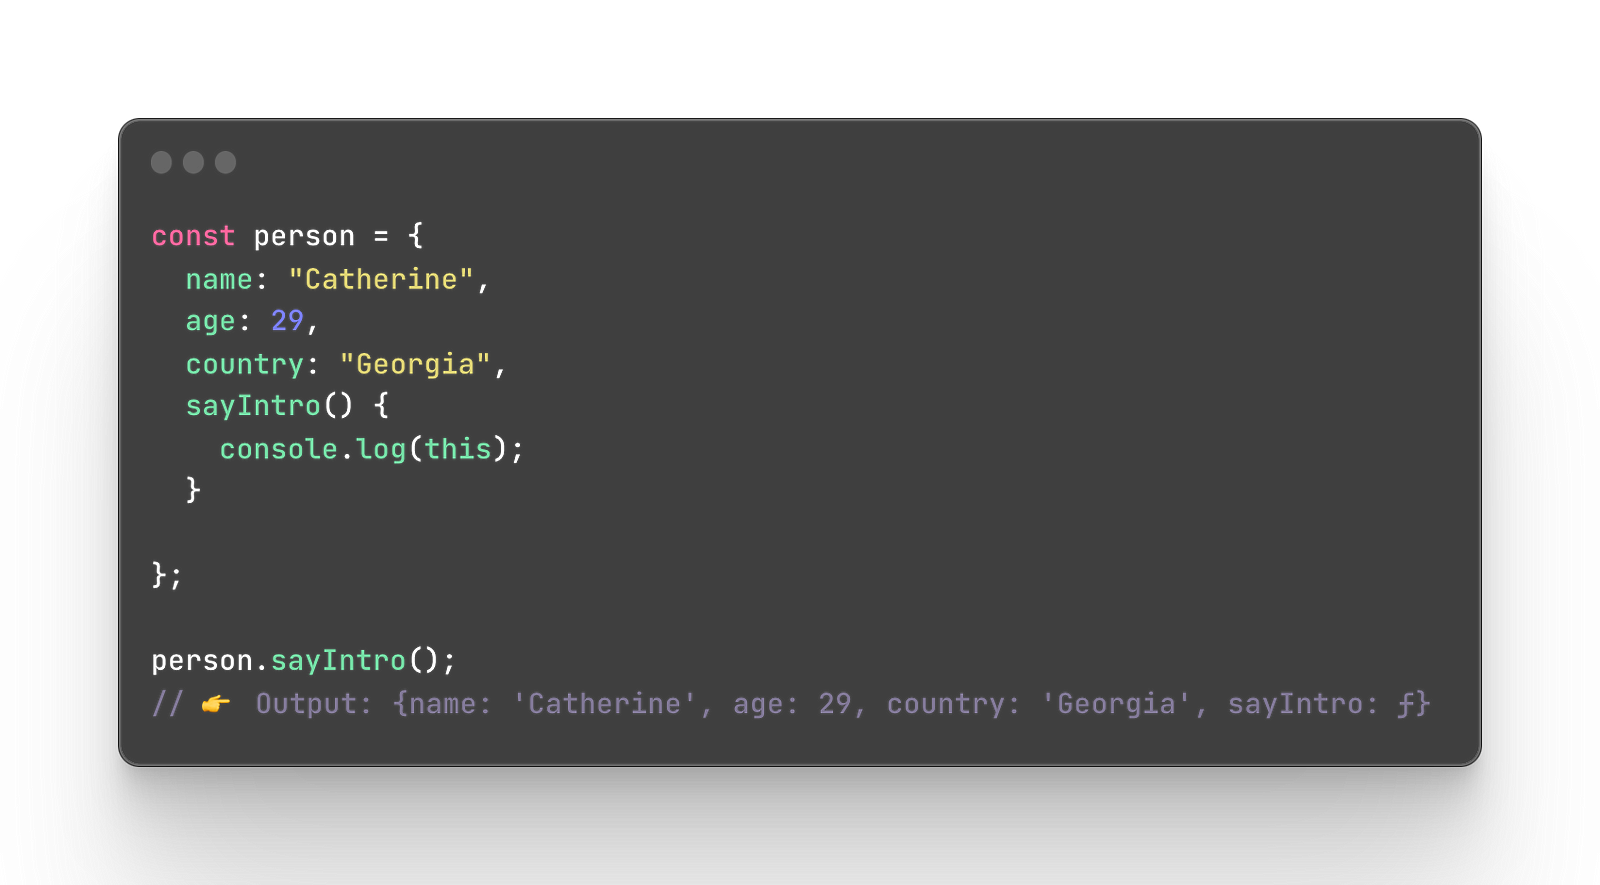
Another good way to check which object the this refers to is by simply logging it into the console. If you do it in the method, it will show you the object where the method is located.
The this in a function
When we use the this keyword in a regular function (not a method) it refers to the global object. The global object is the object that exists in the global scope. To say it simply, global scope is created when your script file runs in the browser to read whatever you have in this file. It is the upper-most box that holds all the information. For example, if you create some variables at the very start of your script file, they will be located in the global scope.
I recommend you read this post to understand how the scope works.
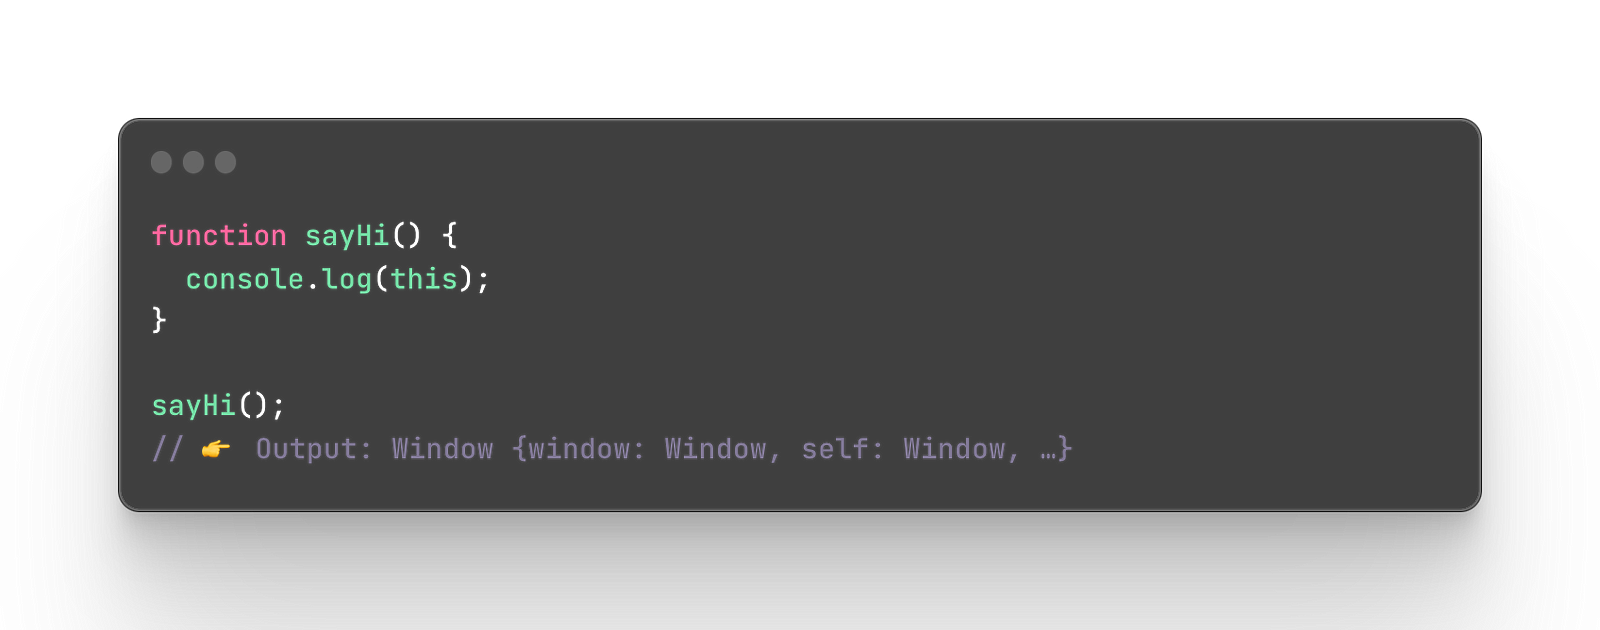
The this in a function (strict mode)
A strict mode in JavaScript is a more strict way of processing JavaScript which is very sensitive to errors if you don’t know 100% what you are doing. To enable a strict mode you simply need to write ‘use strict’ at the very top of your script file. I am not going to cover what exactly it does but you can read about it here.
In the strict mode, the this keyword doesn’t refer to the global object anymore but returns an undefined instead.
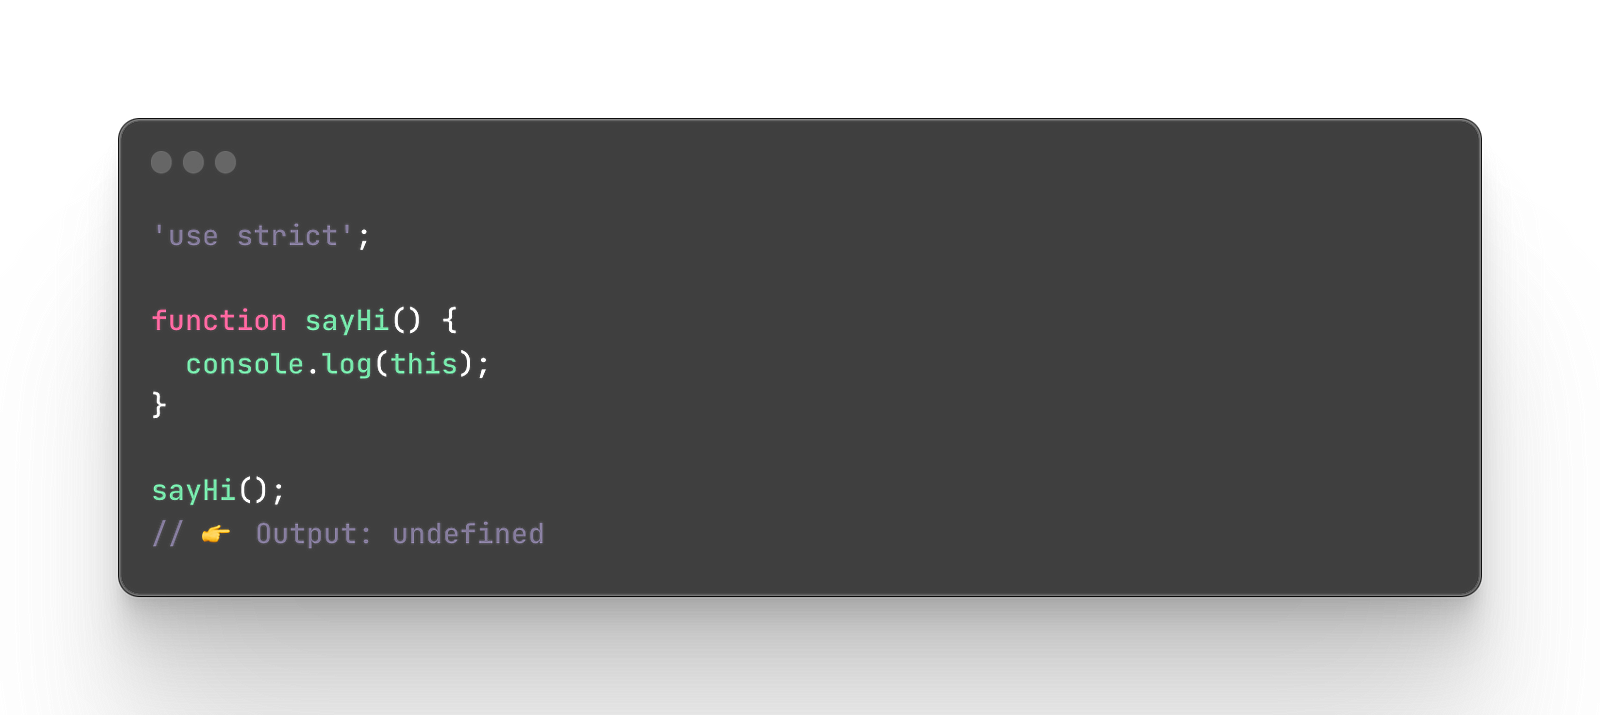
The this alone
Using the this keyword separated from any object or function will refer to the global object that I mentioned earlier. As long as you place it globally, in the main script outside of any functions, blocks, or objects, it will return the global object.
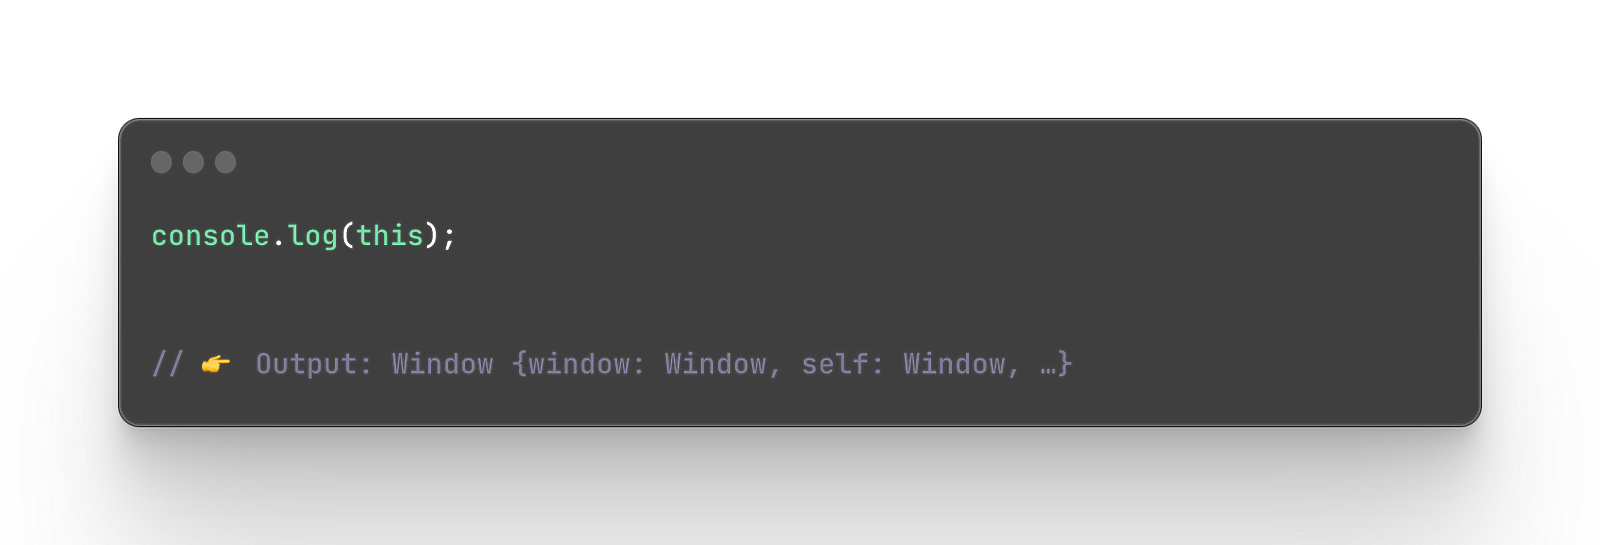
Why would you even need it then separated from everything? Because the window object has various built-in properties that you can use.
The this in event handlers
Events in JavaScript are interactions captured on the HTML element that we can use in order to manipulate them. Let’s say someone clicks a button, we can capture that action and do something in response to this click. When using this with an event handler, the this keyword refers to the HTML element that was clicked.
The this with the call, apply and bind methods
In JavaScript we have three native methods call, apply and bind that can change the way the this keyword behaves.
The call method
The call method can call the object to which we want the this keyword to refer to. This also means that you can call a method on one object and this method can belong to another object.
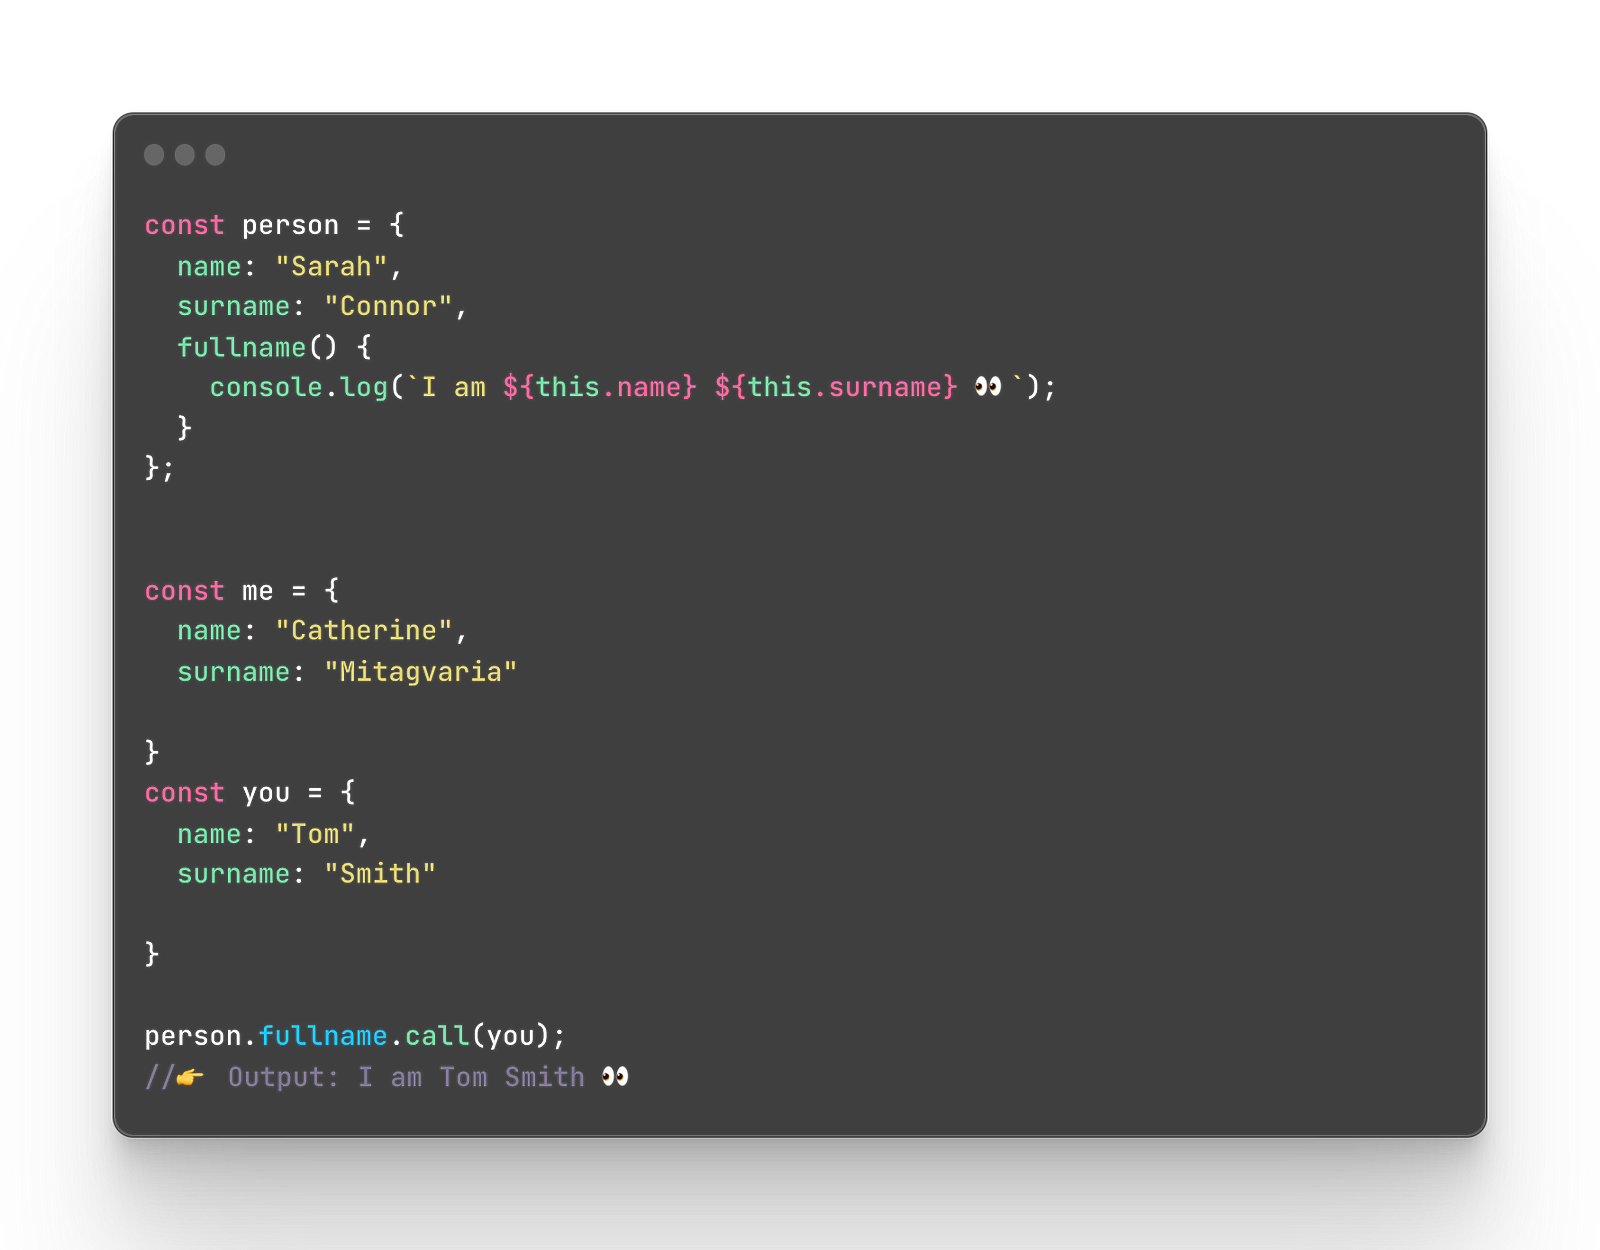
If you have read everything with attention, you remember that this in the methods refers to the object where it’s located. The object person has its name and surname but when we use call the this keyword will refer not to the person object but to the one we pass to the call method.
Using arguments with the call method
The call method also works great with arguments. If the main object where you are getting the method from has some arguments, you can also pass updated arguments. Let’s update the exact same object a little bit.
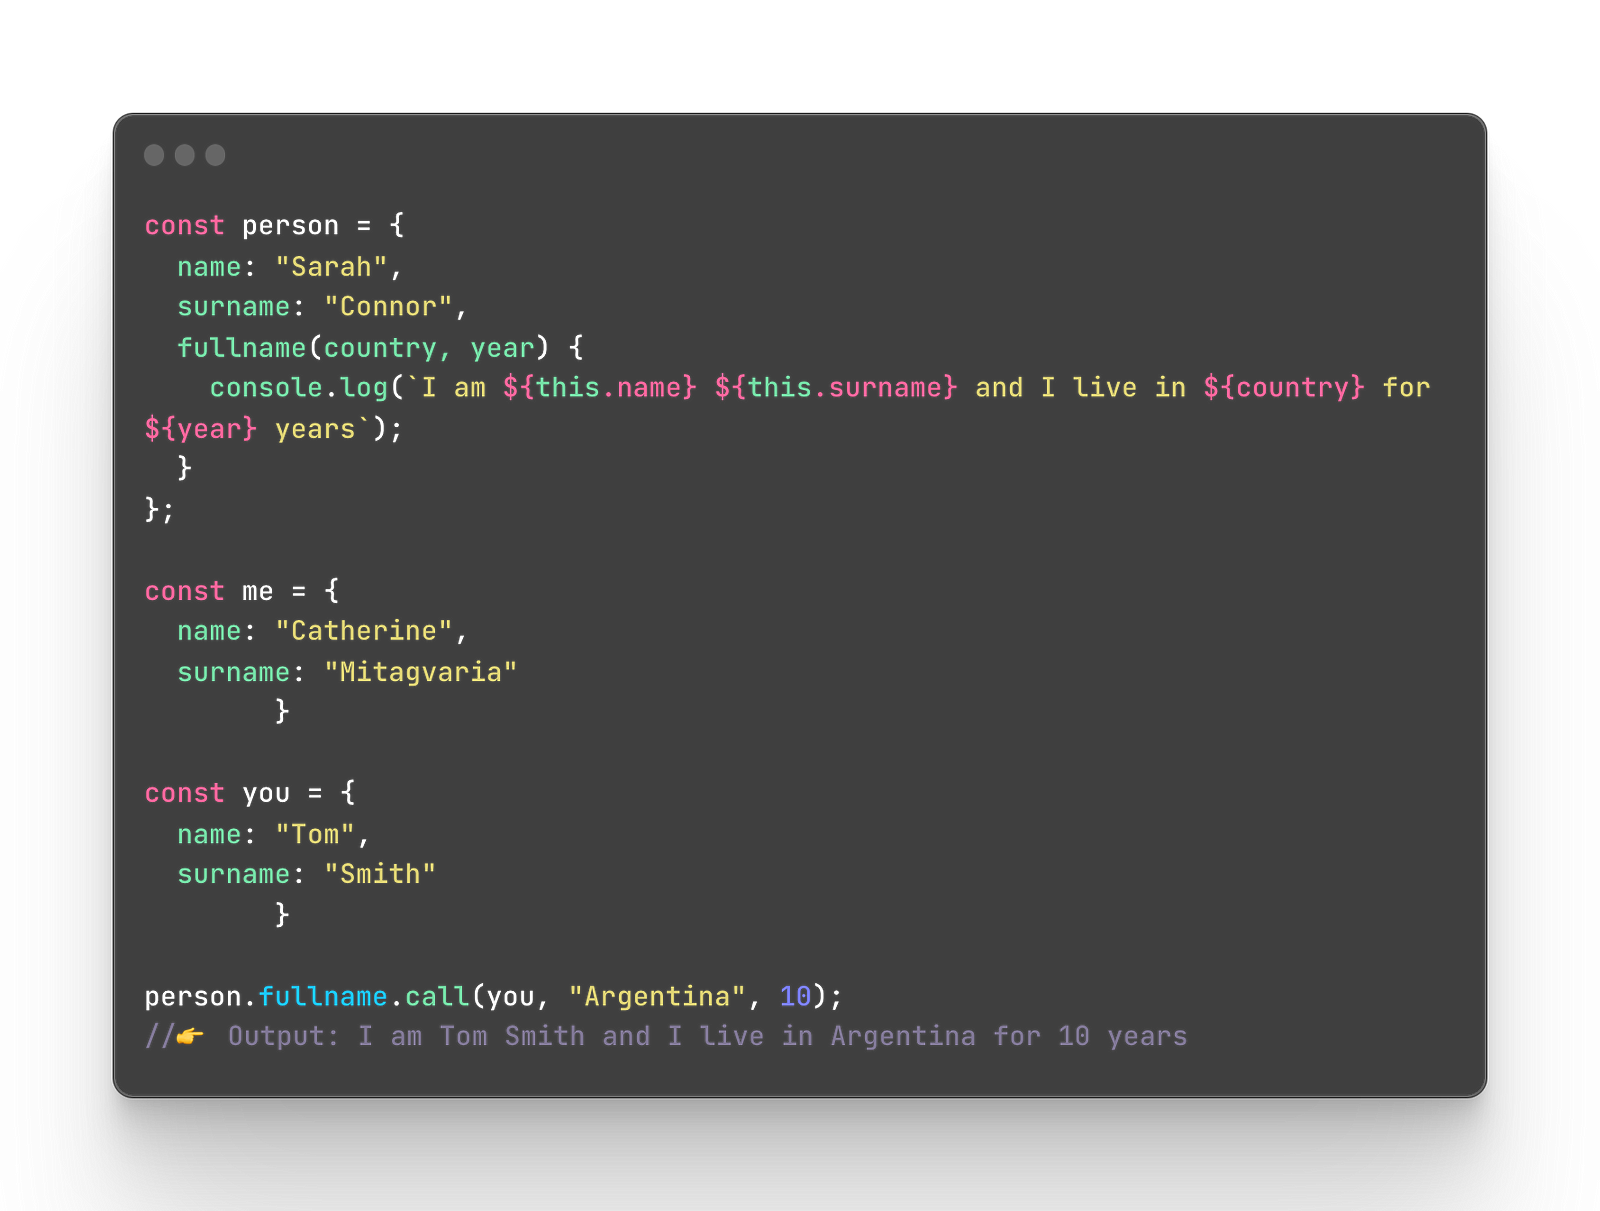
If there are some arguments you need to pass but you don’t, it will show you the result string anyway but the unpasted arguments will become undefined.
The apply method
The apply method does exactly the same thing as the call method. Let’s check it out.

Using arguments with the call method
Although there is a slight difference when it comes to the usage of arguments. Instead of passing the list of arguments you need to pass an array instead. Simple as that, that is the only difference.
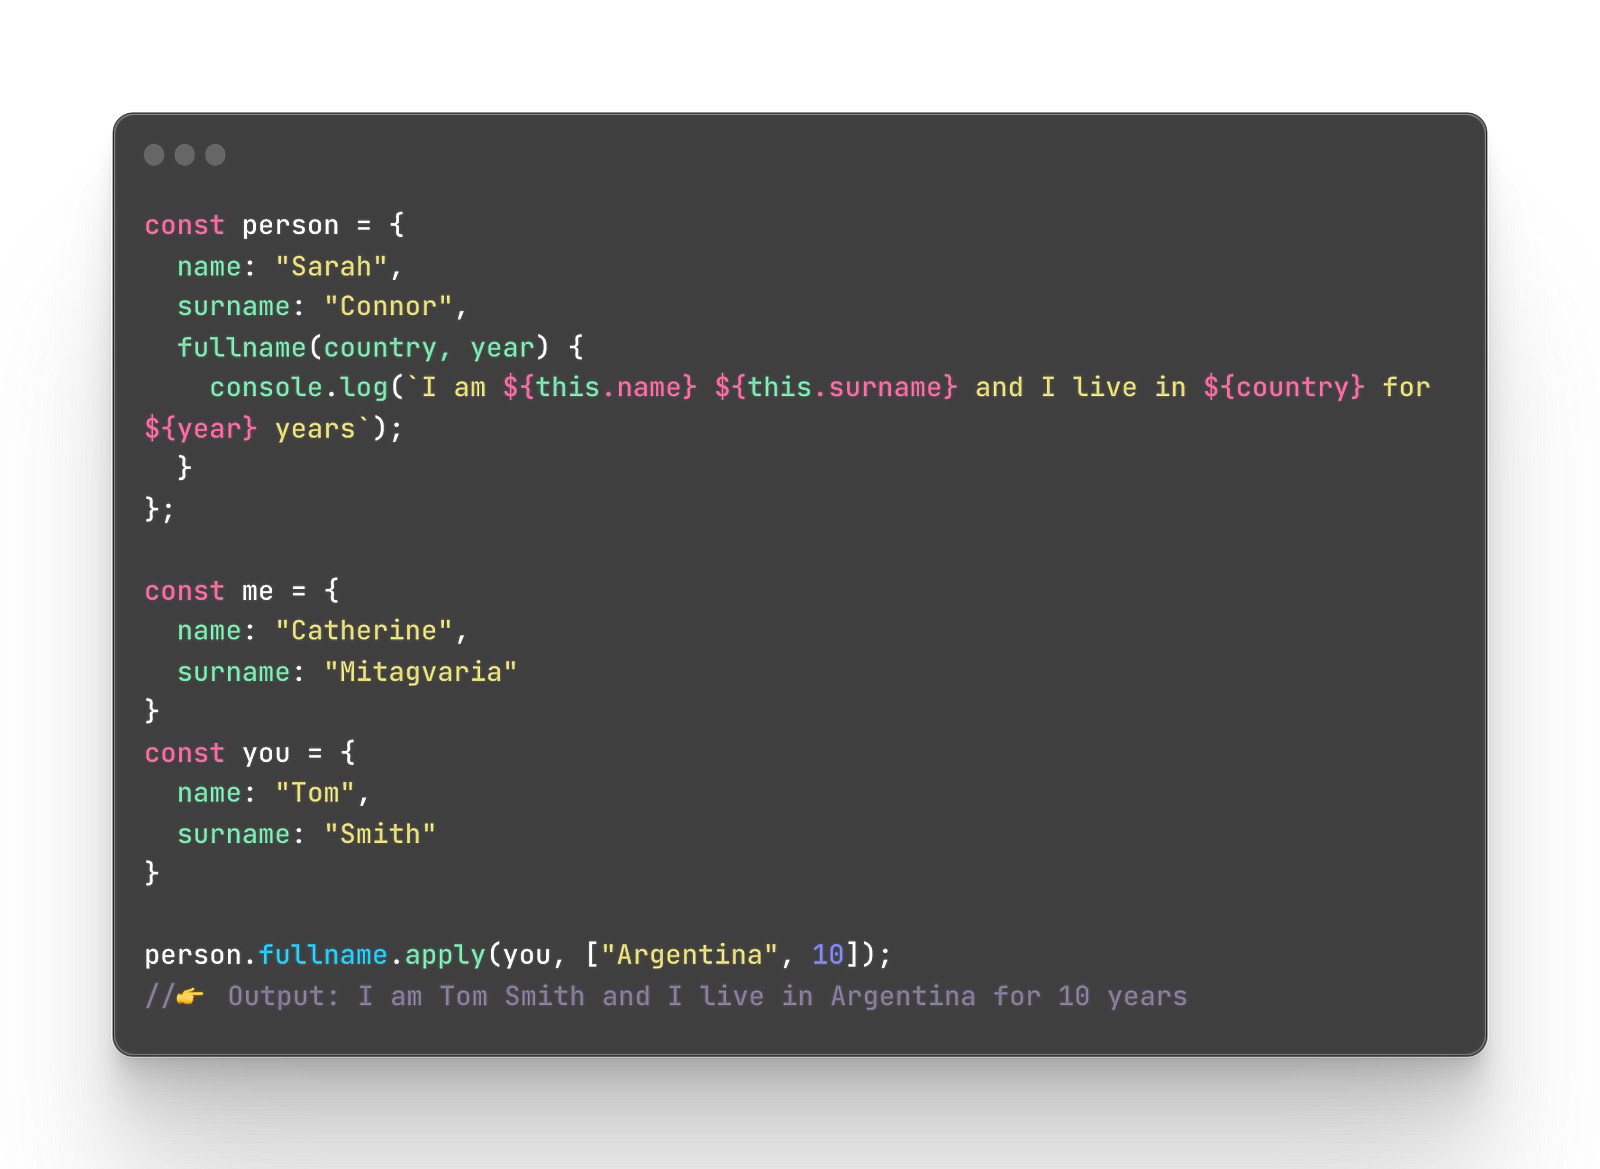
If you don’t use an array, then it will throw an error. It’s very useful if you have data in the type of array so instead of trying to retrieve every single item from the array, for instance, you just pass an array.
The bind method
Just like in the call or apply methods, the bind also helps to change which object the this keyword refers to. However, the bind does not execute the function but returns this function without executing it. In other words, we bind the function first and then we need to execute it separately.
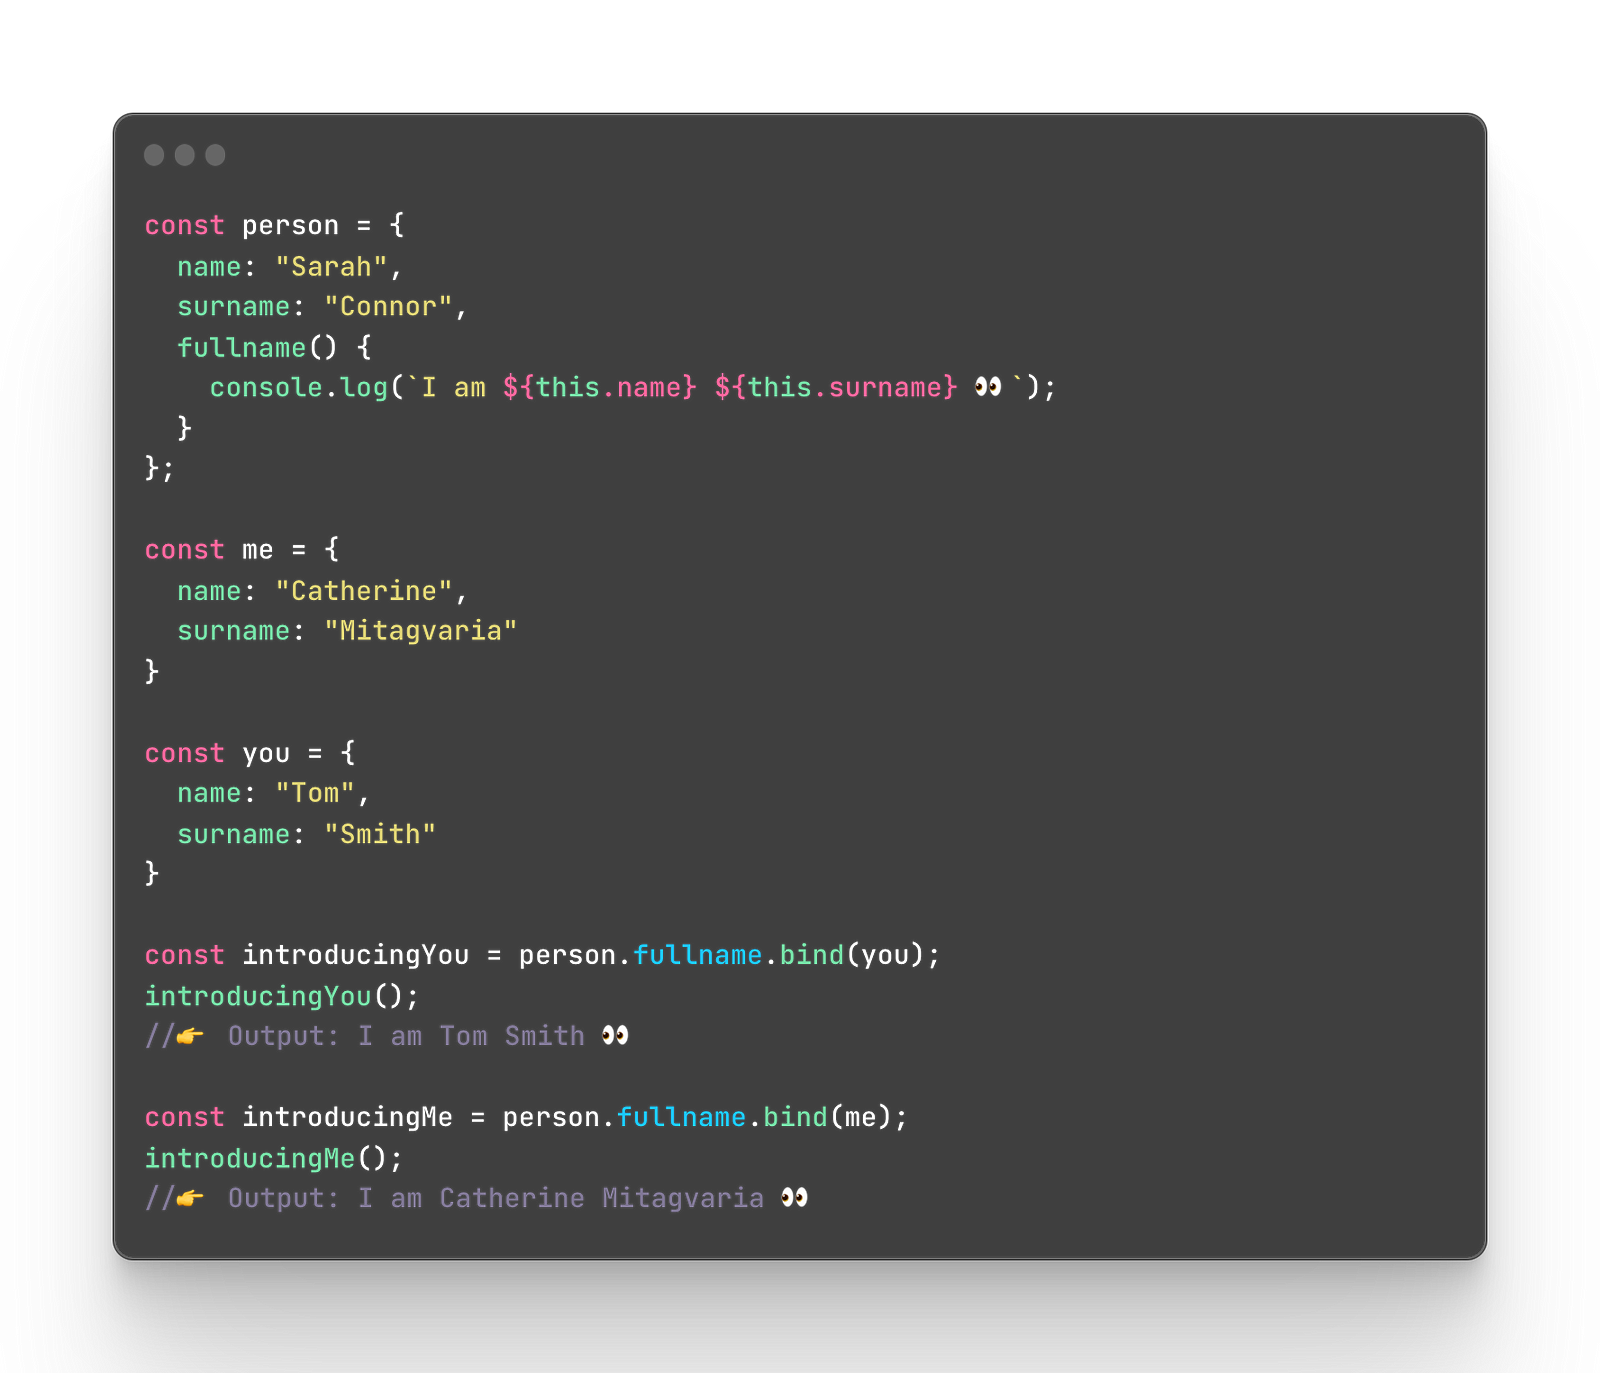
Losing the this in callbacks
Did you know that you can use the this keyword in callbacks? If you have not yet make sure to read about callbacks first if you don’t know what it is exactly.
Here is a simple example.
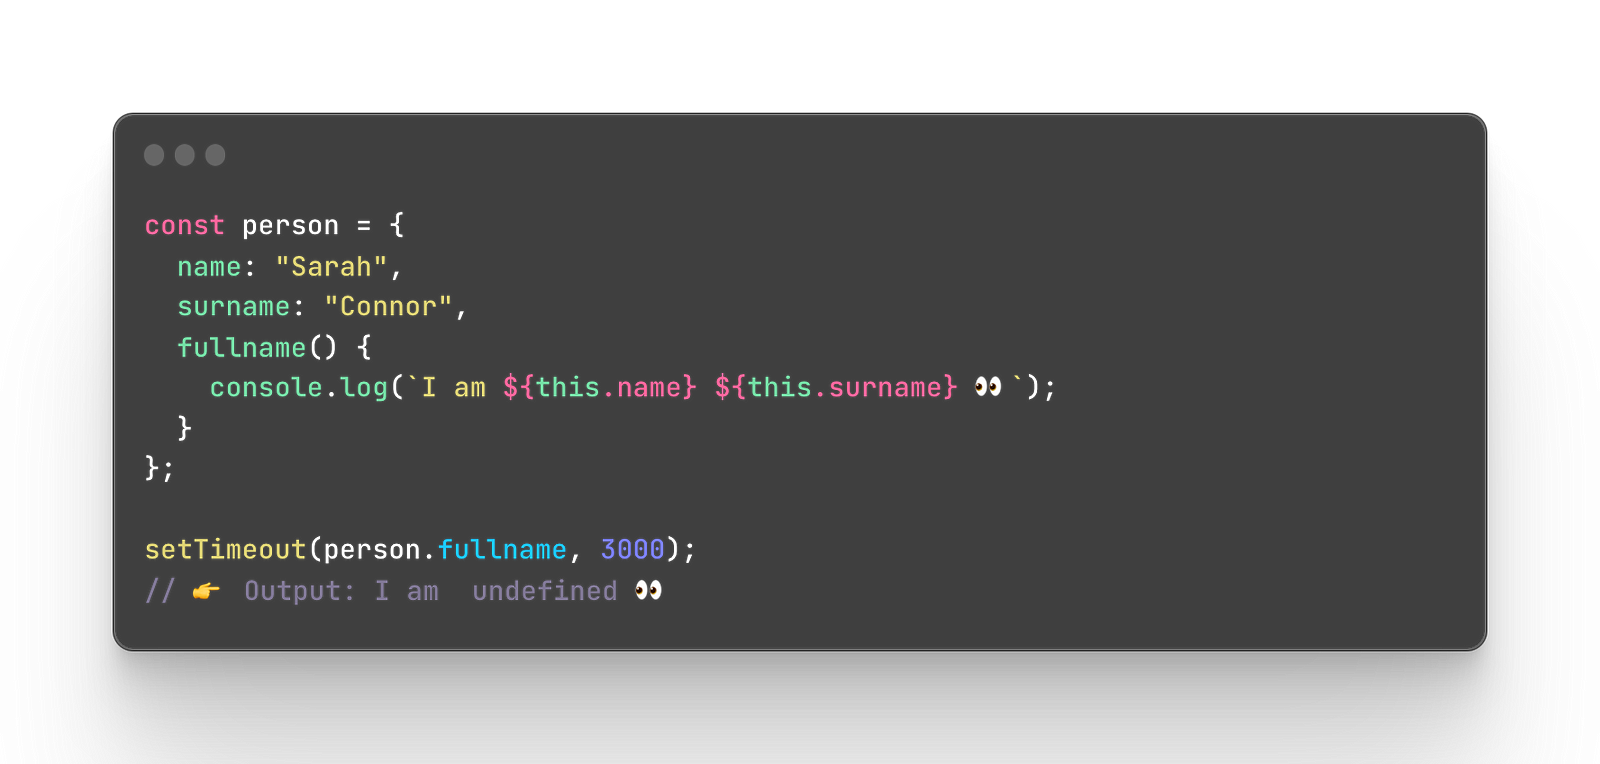
The this loses its context and shows undefined instead.
To solve this issue we need to go back to the topic about the this behavior in a function:
“When we use the this keyword in a regular function (not a method) it refers to the global object. The global object is the object that exists in the global scope. To say it simply, global scope is created when your script file runs in the browser to read whatever you have in this file. It is the upper-most box that holds all the information. For example, if you create some variables at the very start of your script file, they will be located in the global scope”.
And on top of that the this behaves depending on how the function is called. When JavaScript is parsed and executed the engine looks at the reference of the function that is calling this function and checks what object was used to understand what the this refers to in the first place. When we pass the function to the timeout function, it’s not called right away so the execution of that object’s method is not controlled the original object anymore. And when the timeout function calls our function it does not associate it with the object it belonged to any longer and considers it as an independent function. In other words, the method of the object is not a method but a function now.
One of the fast ways to solve this is to wrap the method in a function and call it. The function we wrapped it around doesn’t have any of its own this and it just executes the method we pass to it.
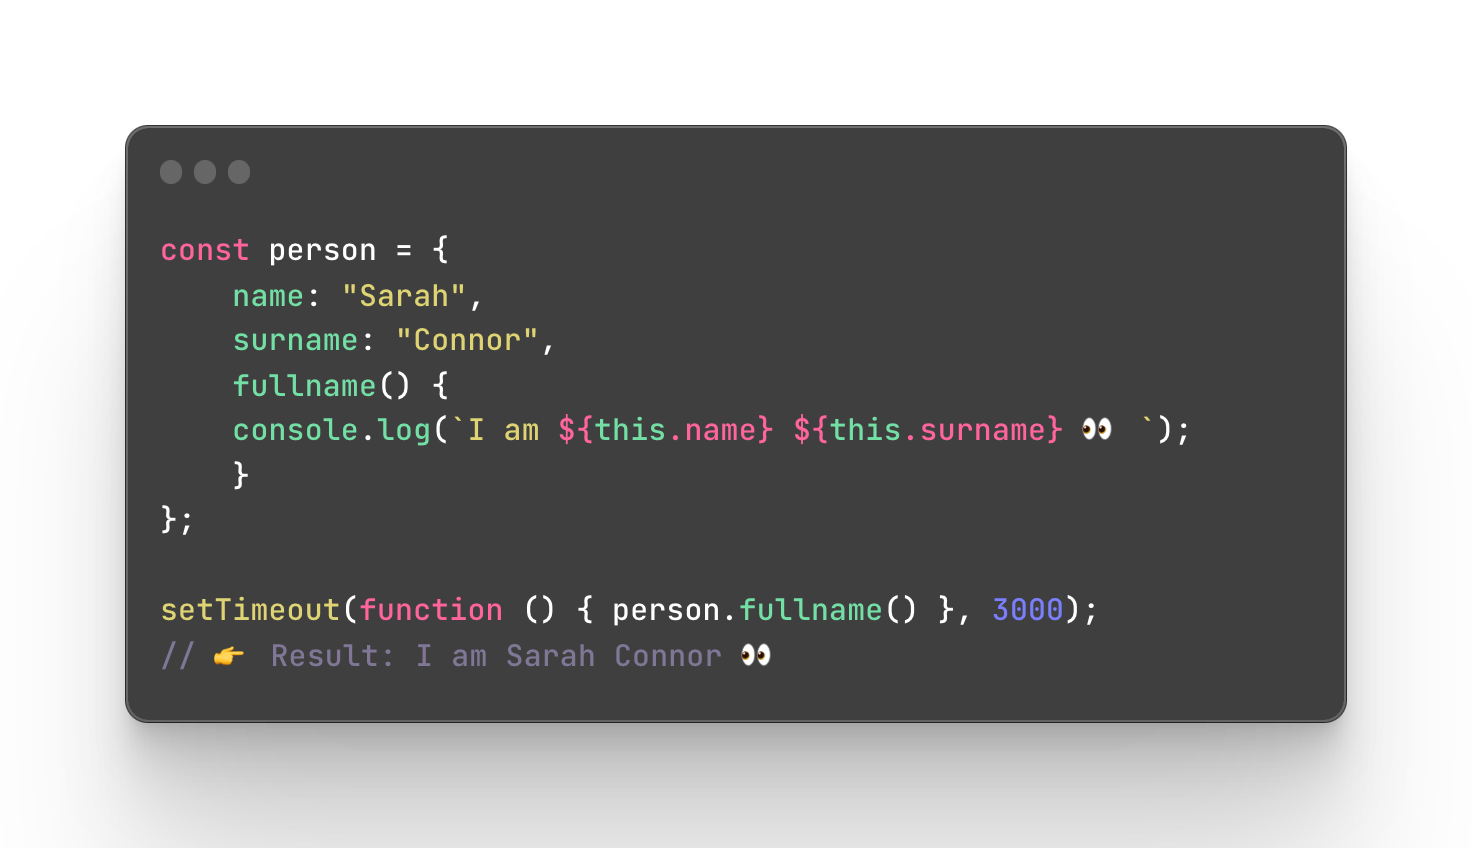
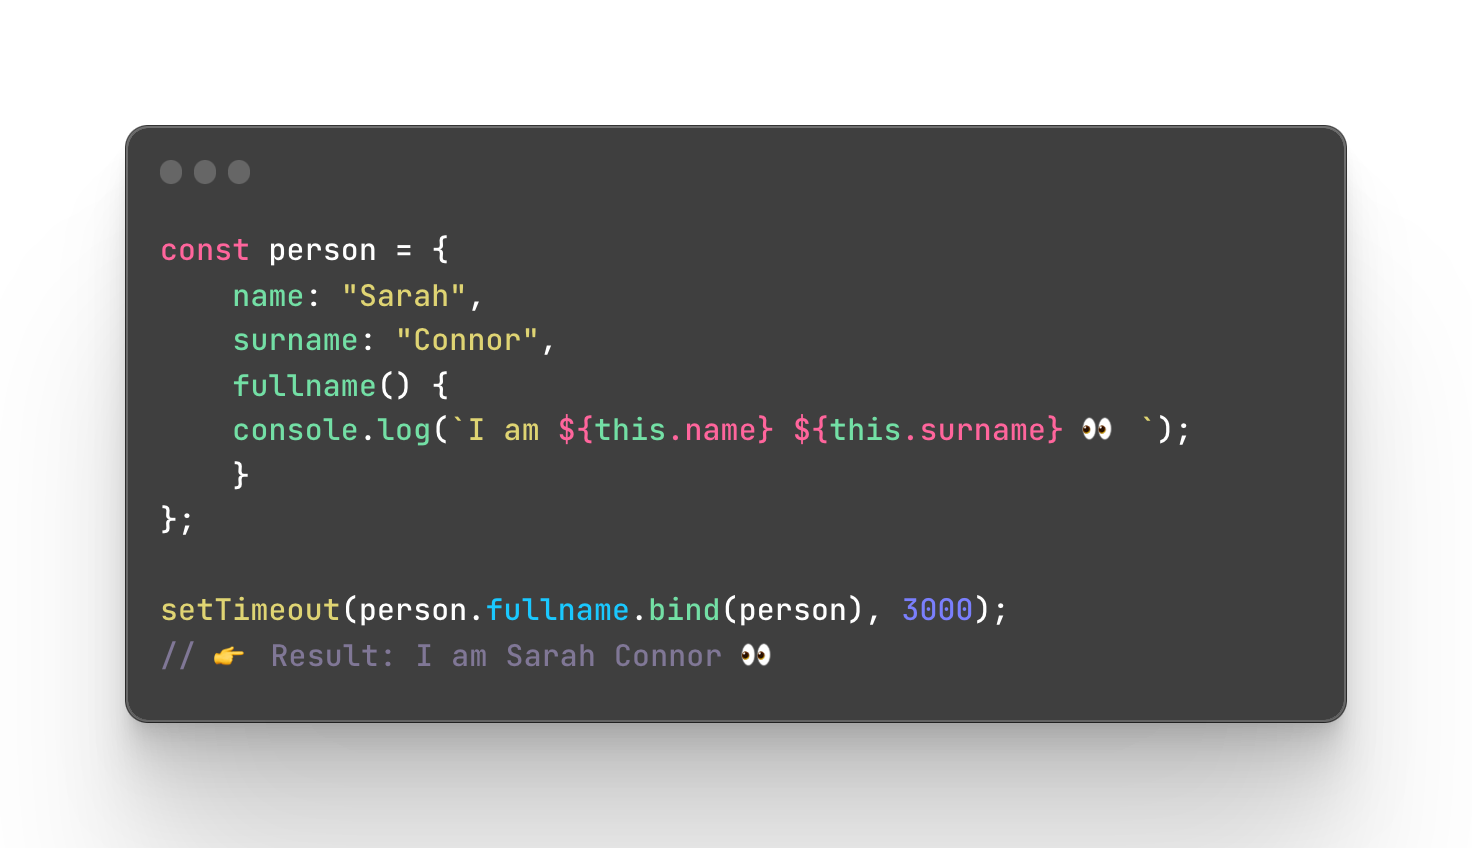
Another solution is to use the method bind and bind the method back to the object so that this doesn’t lose its context.
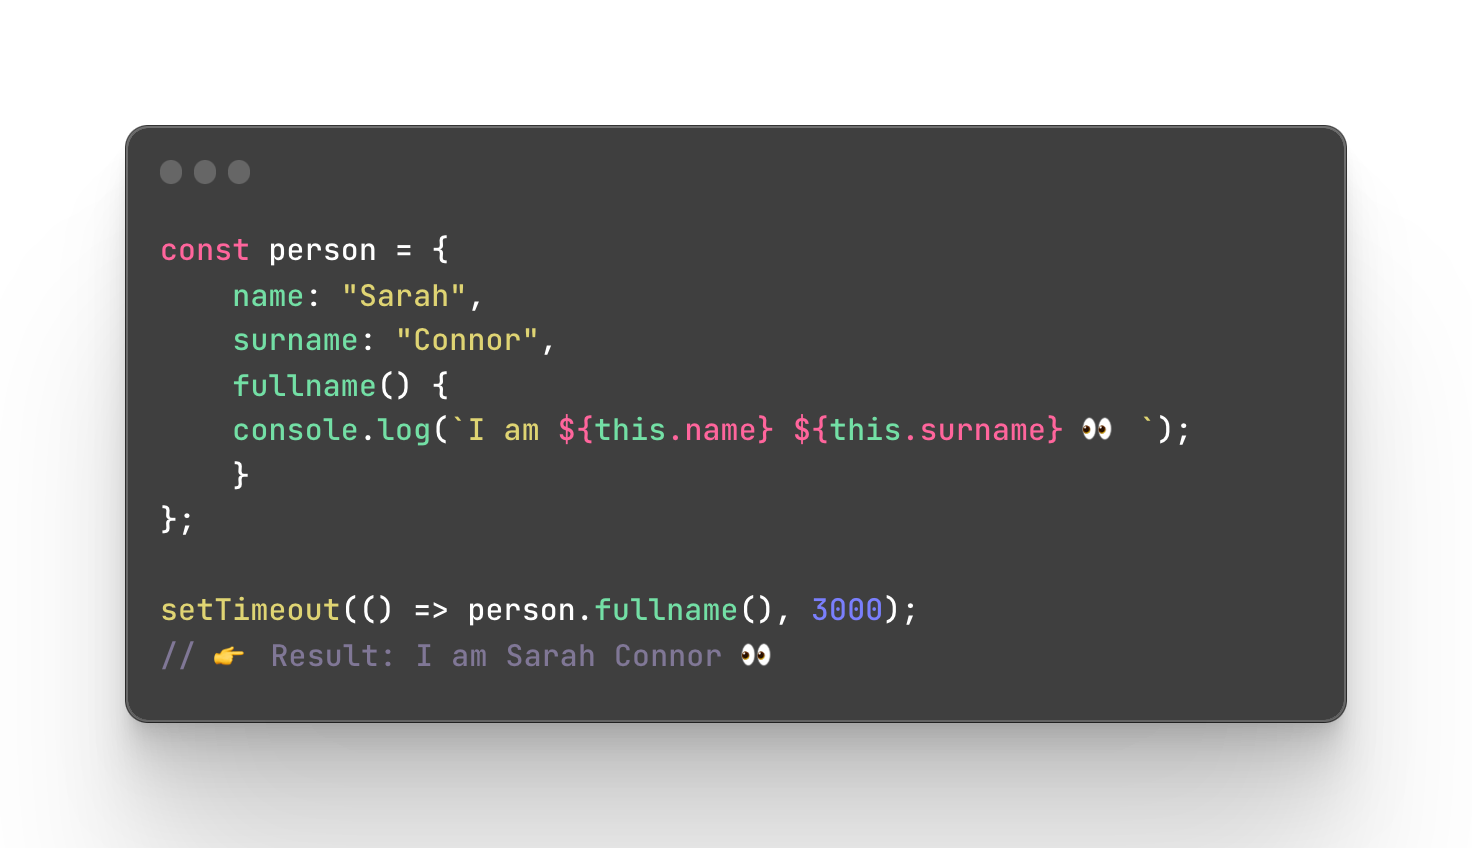
The third option you can use is almost the same as the first one but you can also use an arrow function to make it shorter.
Accessors (getters and setters)
JavaScript accessors like getters and setters are methods used to get and set values.
Before going further let’s quickly understand what encapsulation is and how it’s connected to these accessors.
In programming, encapsulation refers to saving and storing the data in a way that makes it more restricted or limited to access this data directly. It’s a way of hiding data in order to prevent its exposure. Sometimes there is a type of data that is too vital and easy access makes it more vulnerable to changes. That’s why encapsulation is a great way to protect this data.
This is when accessors come into play as they help to avoid overwriting important data as well as validation of data before saving it.
Creating getters and setters
To create a getter or a setter, you can simply create methods inside the object just like down below.
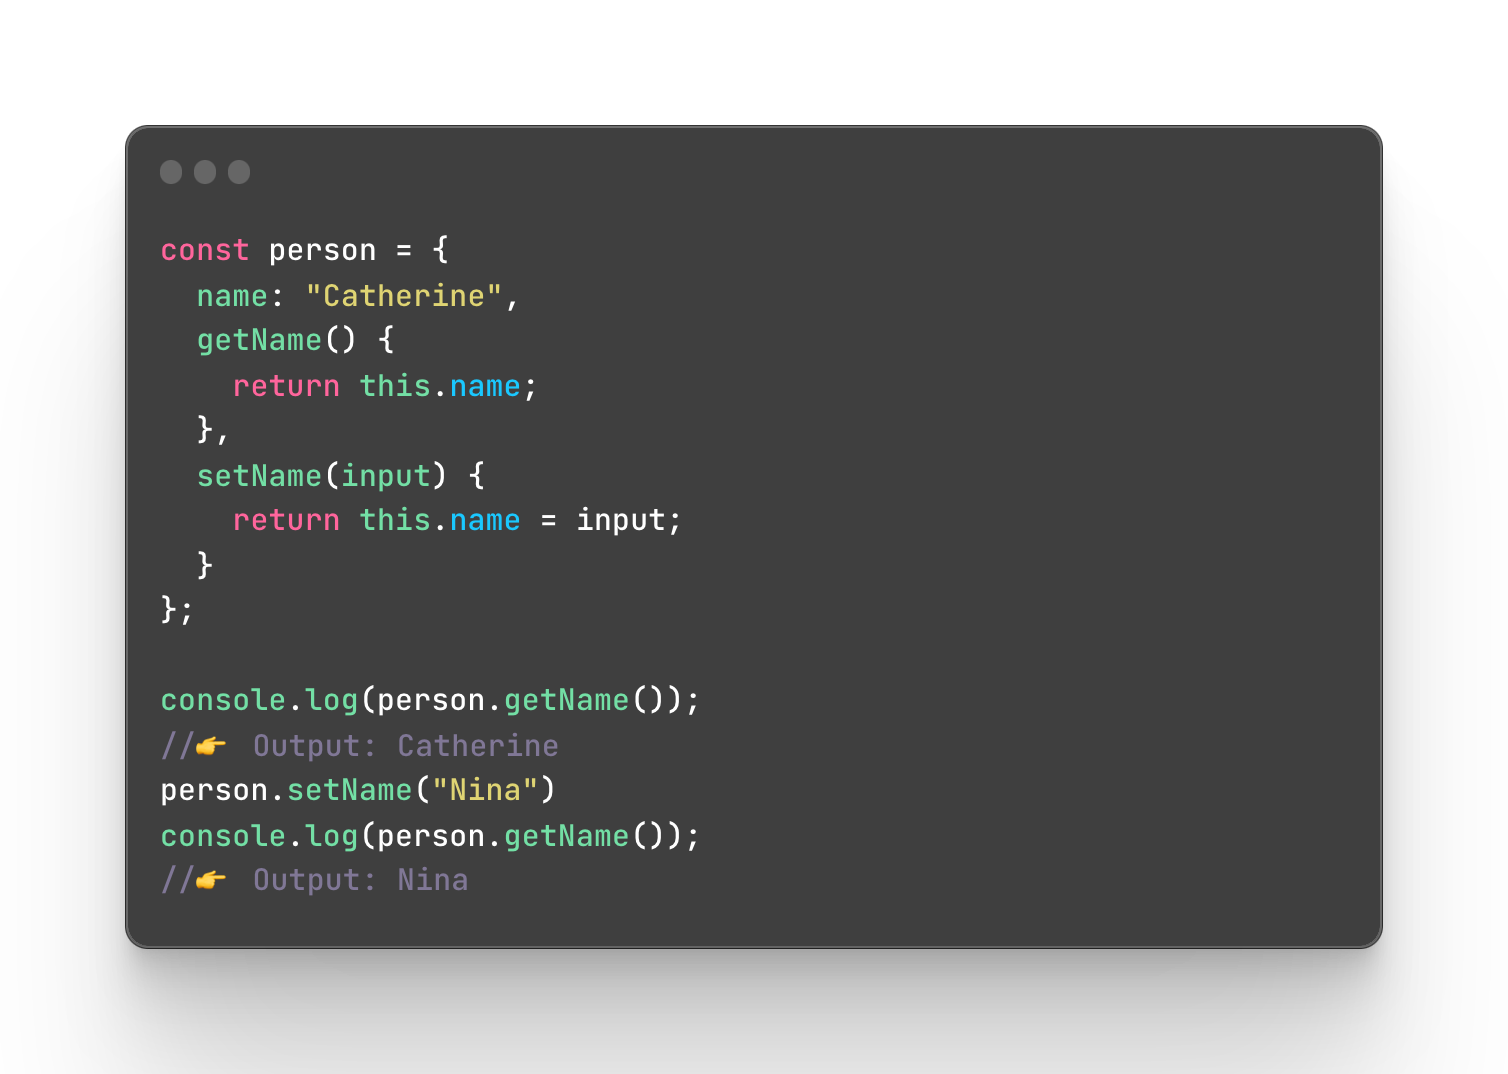
A more official way to use getters or setters however is usage of the keywords get and set. It is almost the same. You simply create a function but with the keyword at the start.
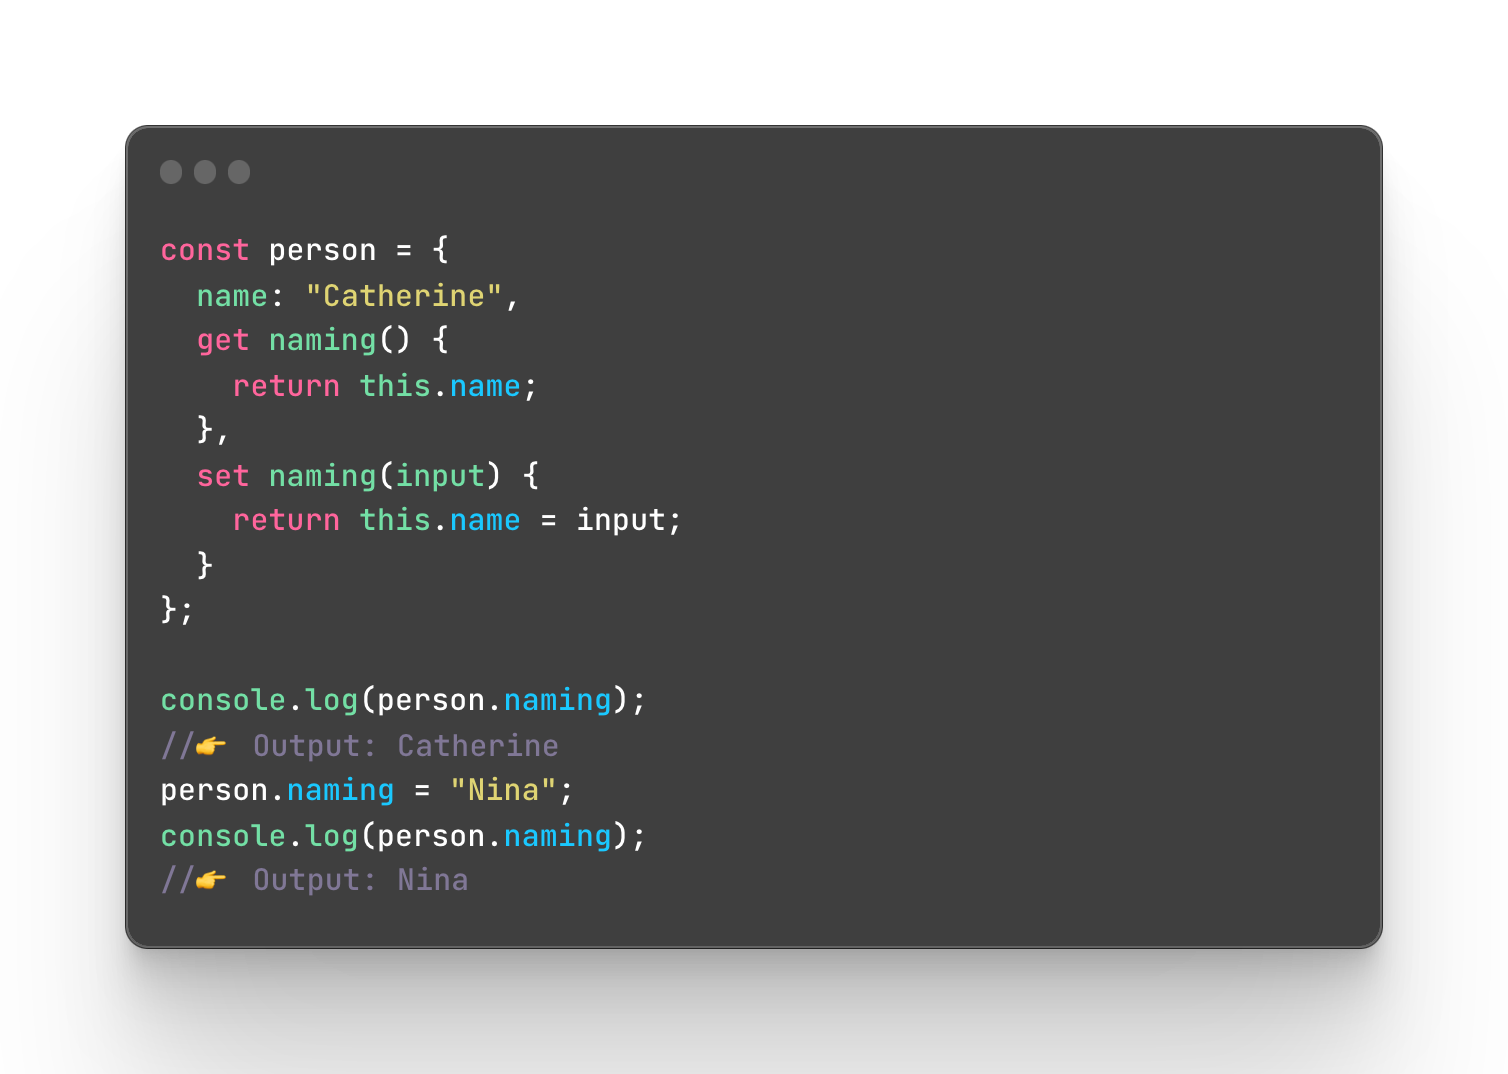
Both ways work fine however using the second solution is much better as it has less chance that you will assign a wrong value and lose the data completely. If you noticed in the first example, it’s just a regular function where you add value through a parameter. In the second example, you set the value as a property instead of calling the function.
If for any reason you decide to use regular functions instead of get or set keywords, there is still a way to decrease the chances of making mistakes.
You can make the properties inside the getters and setters read-only. A read-only property means that you cannot overwrite or reassign it, so it’s only readable. Remember I showed you the property attributes? The attribute writable is set to true by default which means that we need to set it to false to make the property read-only.

To achieve that, we can use Object.defineProperties.
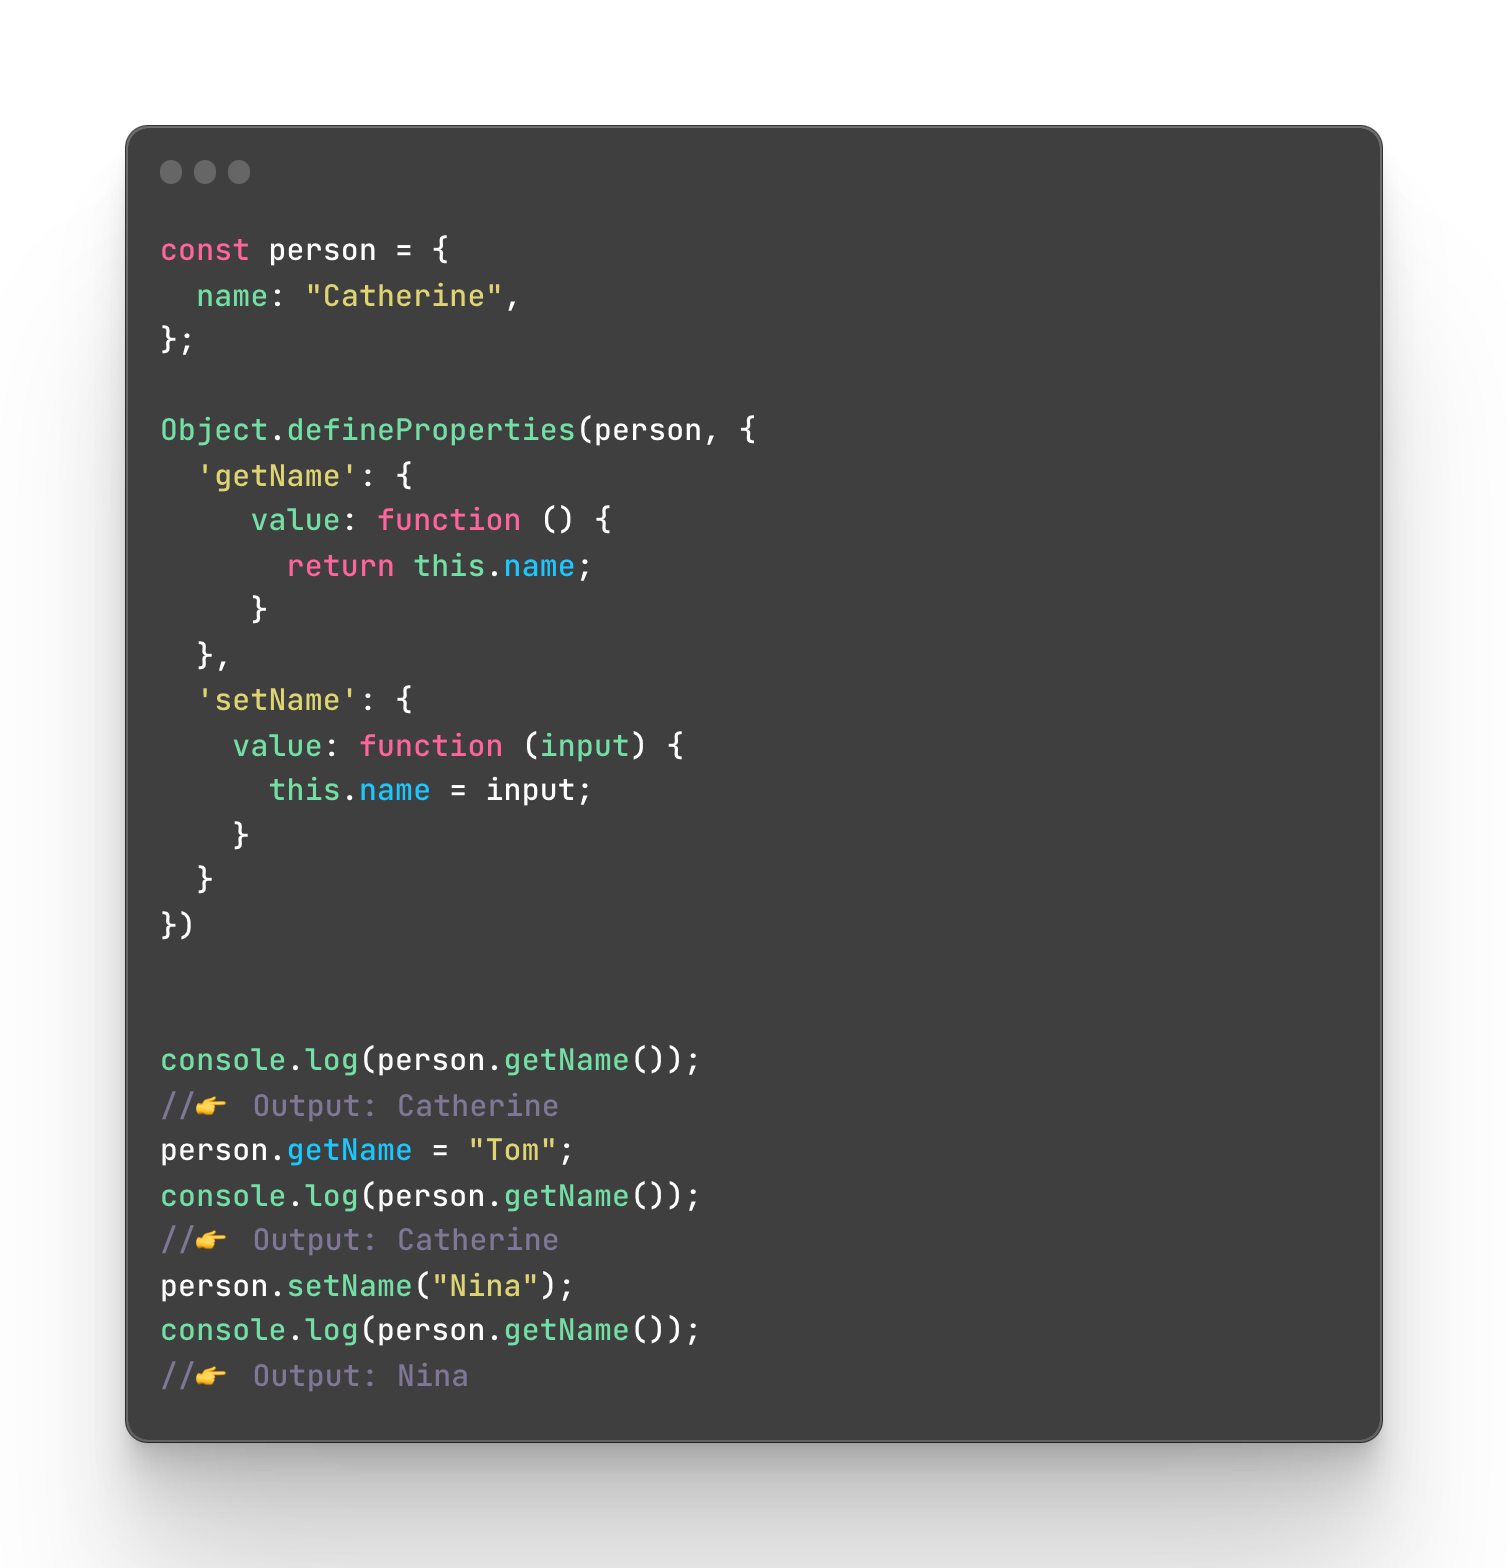
Protecting data in getters and setters
Just because you decide to use getters or setters, it doesn’t mean that the data is protected and we are good to go. Here is a simple example of the previous object that I am going to change with ease.
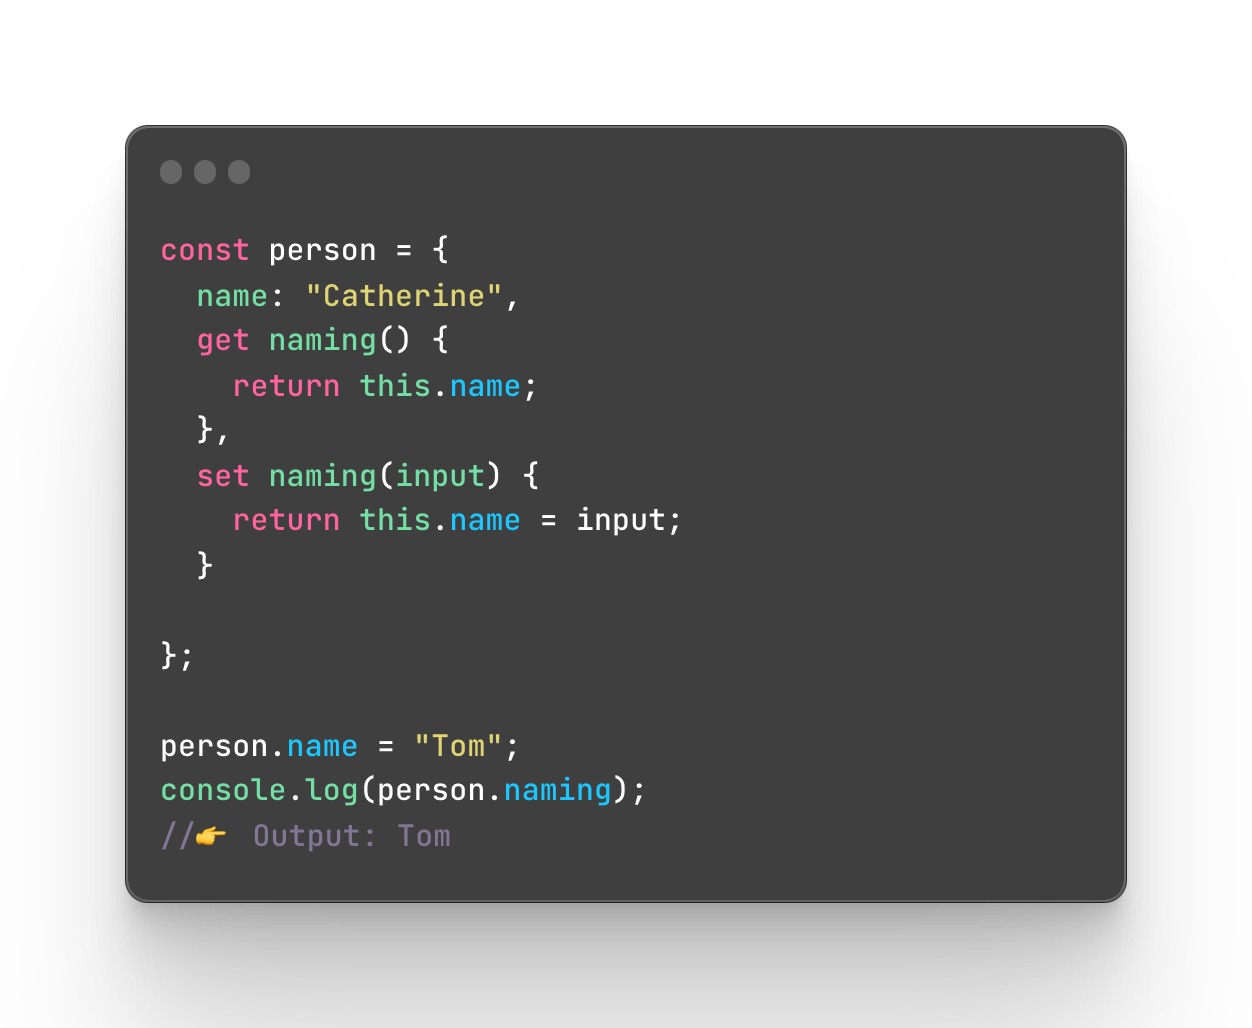
To protect the data, you should use the knowledge of scoping in JavaScript! If you have not yet, make sure to read more about the context and scope of the execution until you continue further.
A function scope
To protect the data with the help of a function scope, you can keep the data inside a function (that creates a function scope) and return an object with getters and setters.
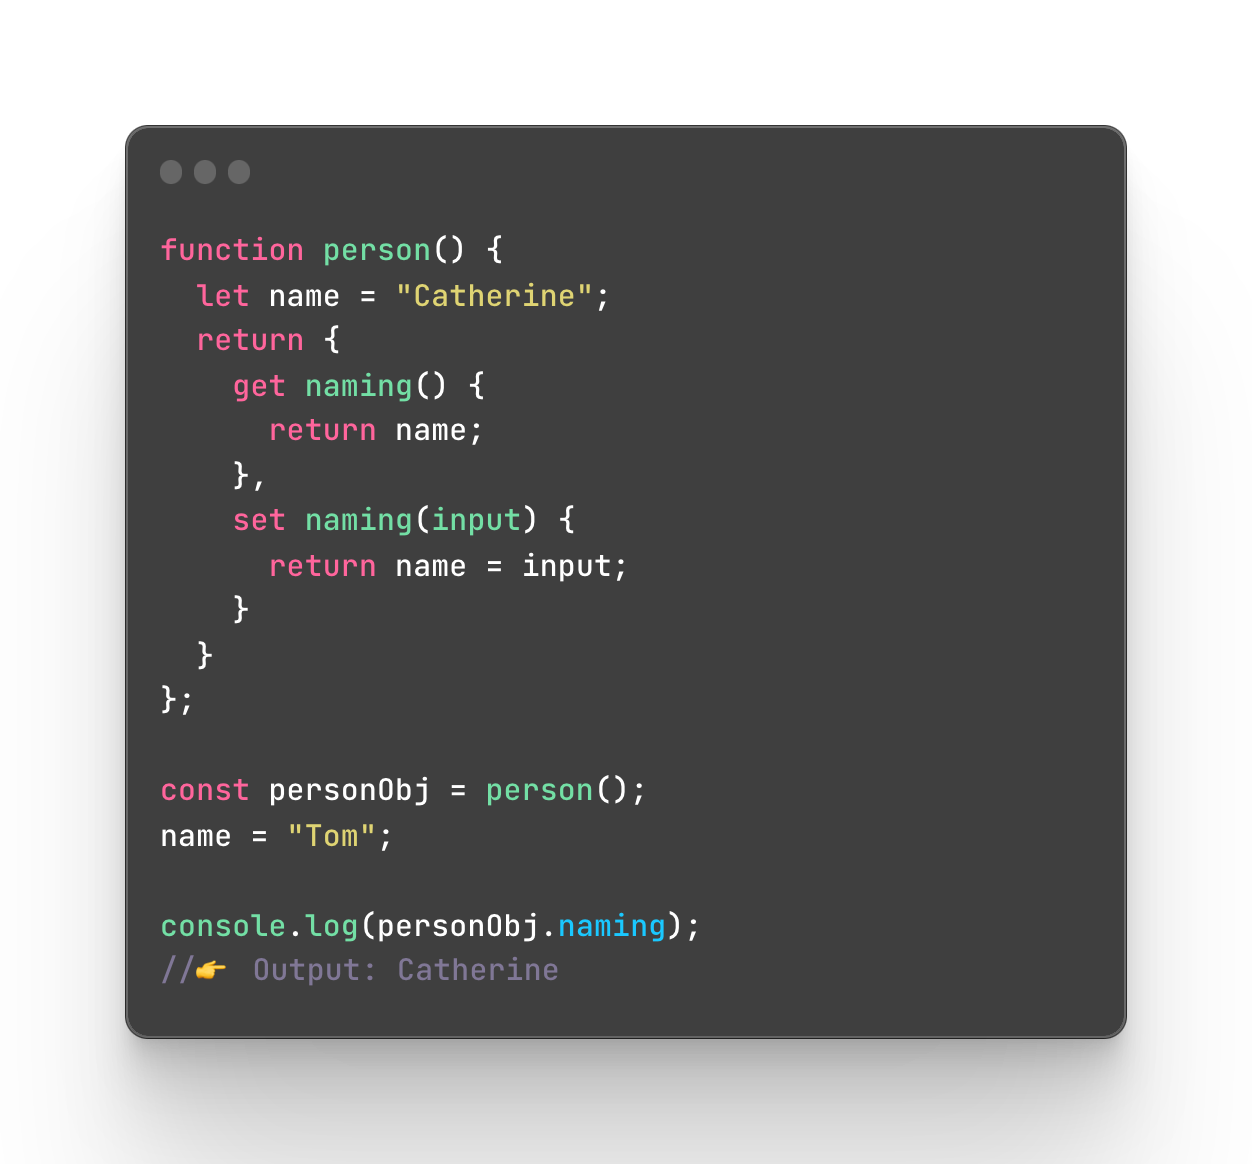
If we try to change the name variable outside the function it won’t change because it is ‘hidden’ inside the function scope.
A block scope
The same logic will work if we place the code in the block scope (encapsulate it in the braces). But in this case, I also define the person object with var so it can be accessible outside this block.
Note that in this case, we didn’t use any if or while statement to use the braces, it is done for a purpose to keep the data ‘hidden’.
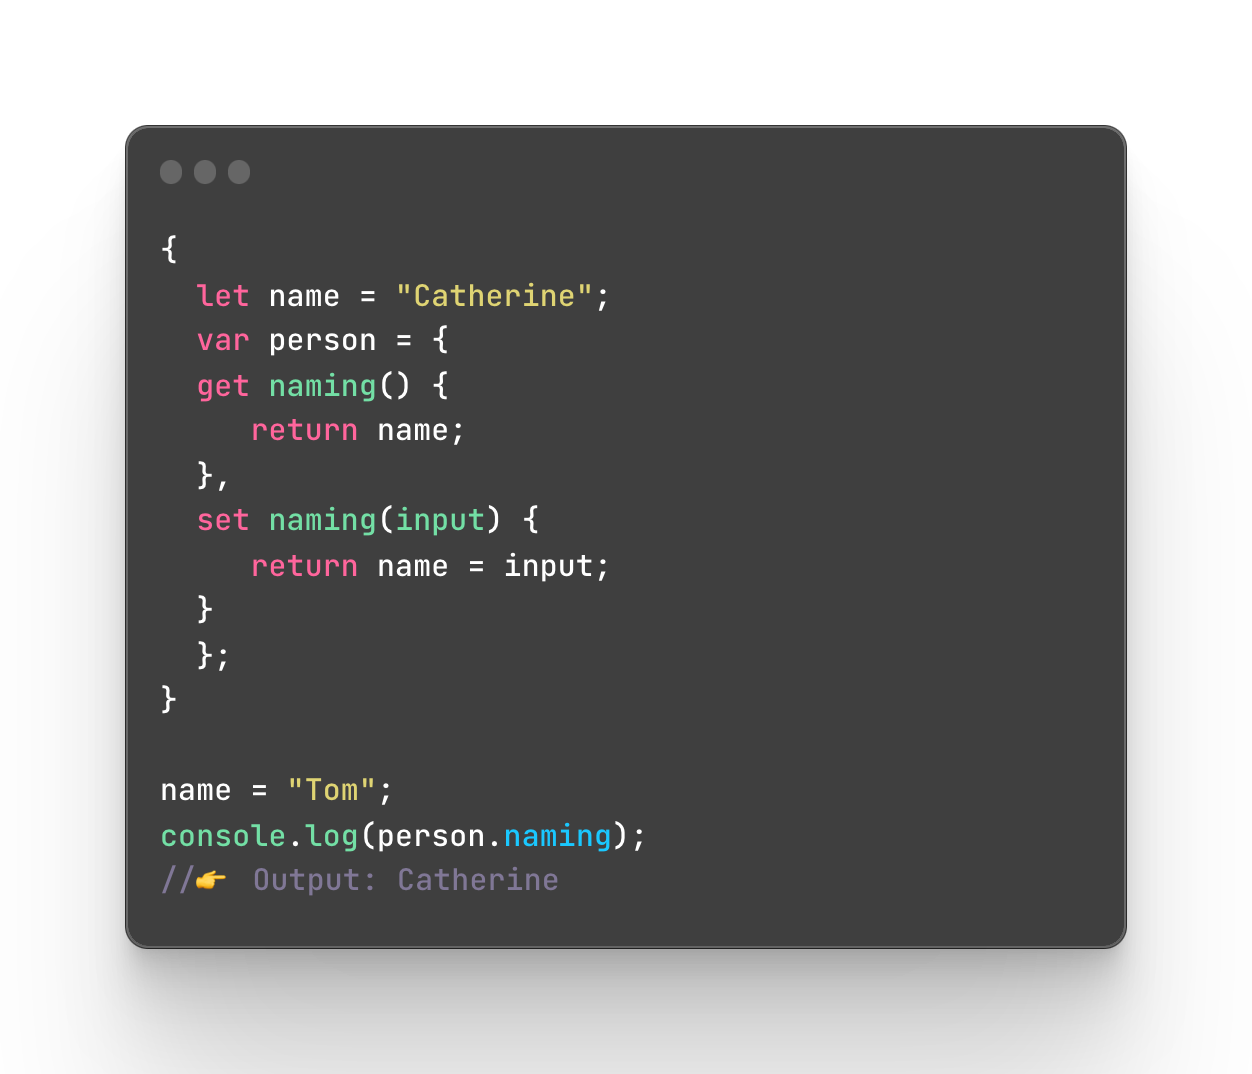
Which one is the best way? I would say that the first but it really depends on the situation, who you work with, how the logic of code is built, and your knowledge if you are working on a new or personal project.
Iterating over objects
An iterable in JavaScript is a data structure that has a mechanism that allows accessing its elements in a sequential manner. In other words, it’s a possibility to loop over the elements.
When it comes to objects however you cannot just loop over them with existent loops like for or for..of. Instead, you can iterate over object properties using Object.keys or entries using Object.entries.
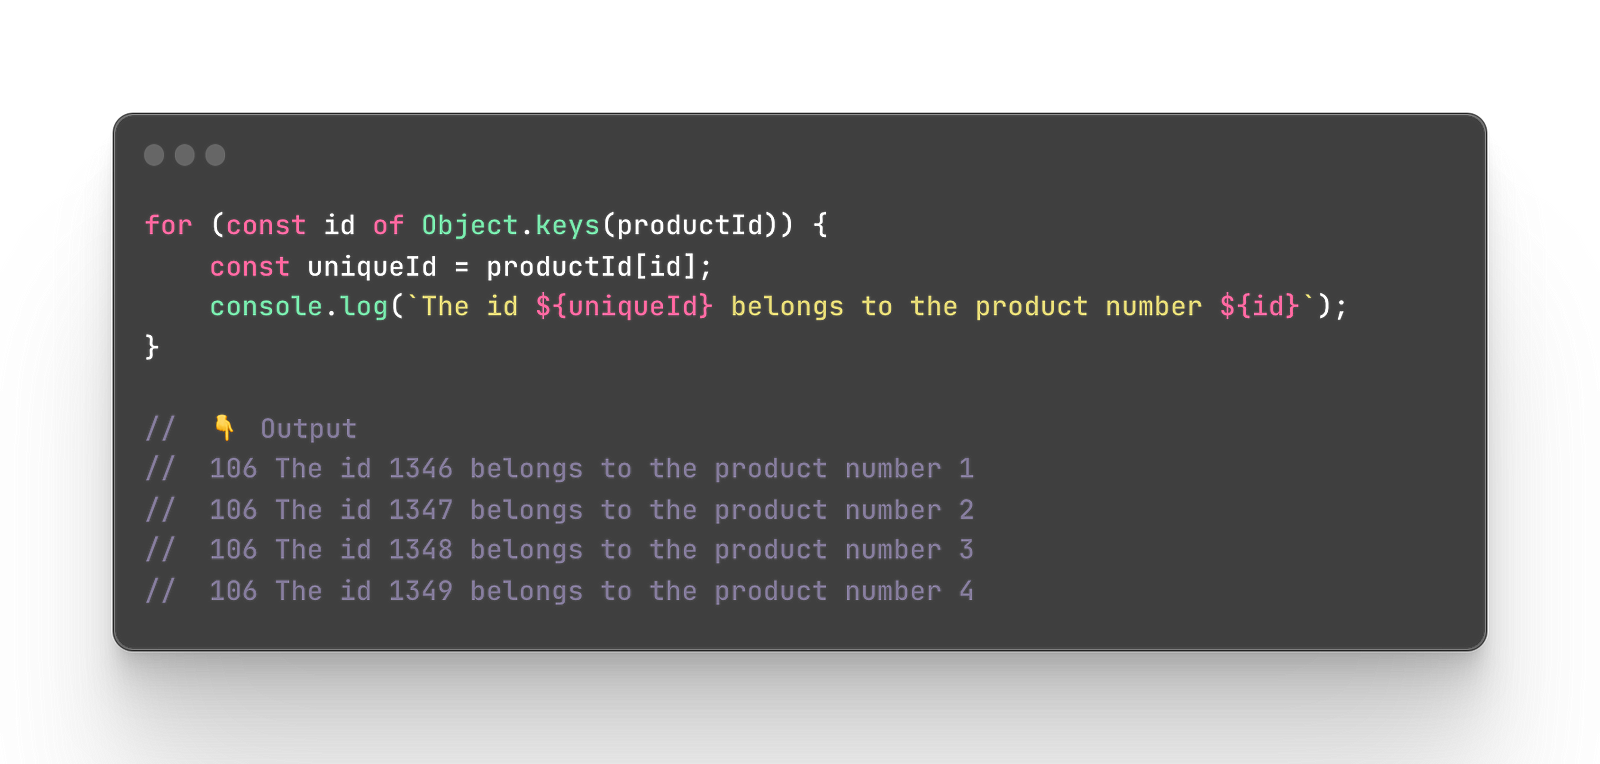
To loop through properties you can use a for…of loop where you will loop through the keys of the object first and then you can use this key to access the value just like I did down below. My key will be the variable id and the value will be accessed using yourObject[theKey], productId[id] in my case that I saved in a separate variable.
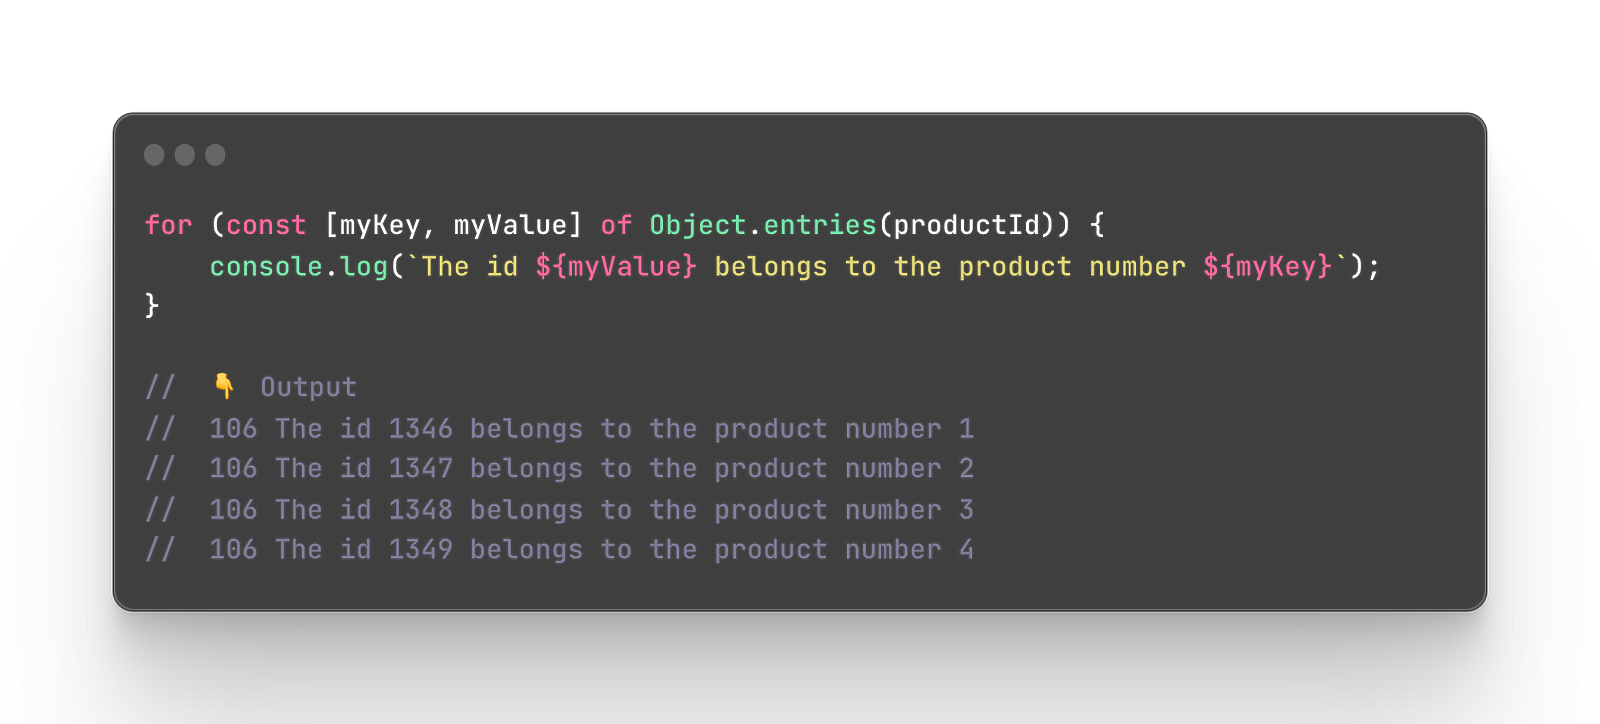
Another way is almost the same where we use Object.entries. It returns an array of key-value pairs. Note that the key returned will be a string instead of a number but the value will be whatever data type you use.
You can also loop through object values by using Object.values but it will return an array with values and you will need additional manipulations to find a specific key if you need it.
Destructuring
In JavaScript, destructuring means retrieving/extracting a value from objects (and not only), saving the values in variables, and on top of that you can do this with several properties at the same time. You can destructure JavaScript objects in two ways, an old way, and a modern way. There is no big difference but there is a reason why the modern way is much better that I will show you shortly.
The old way
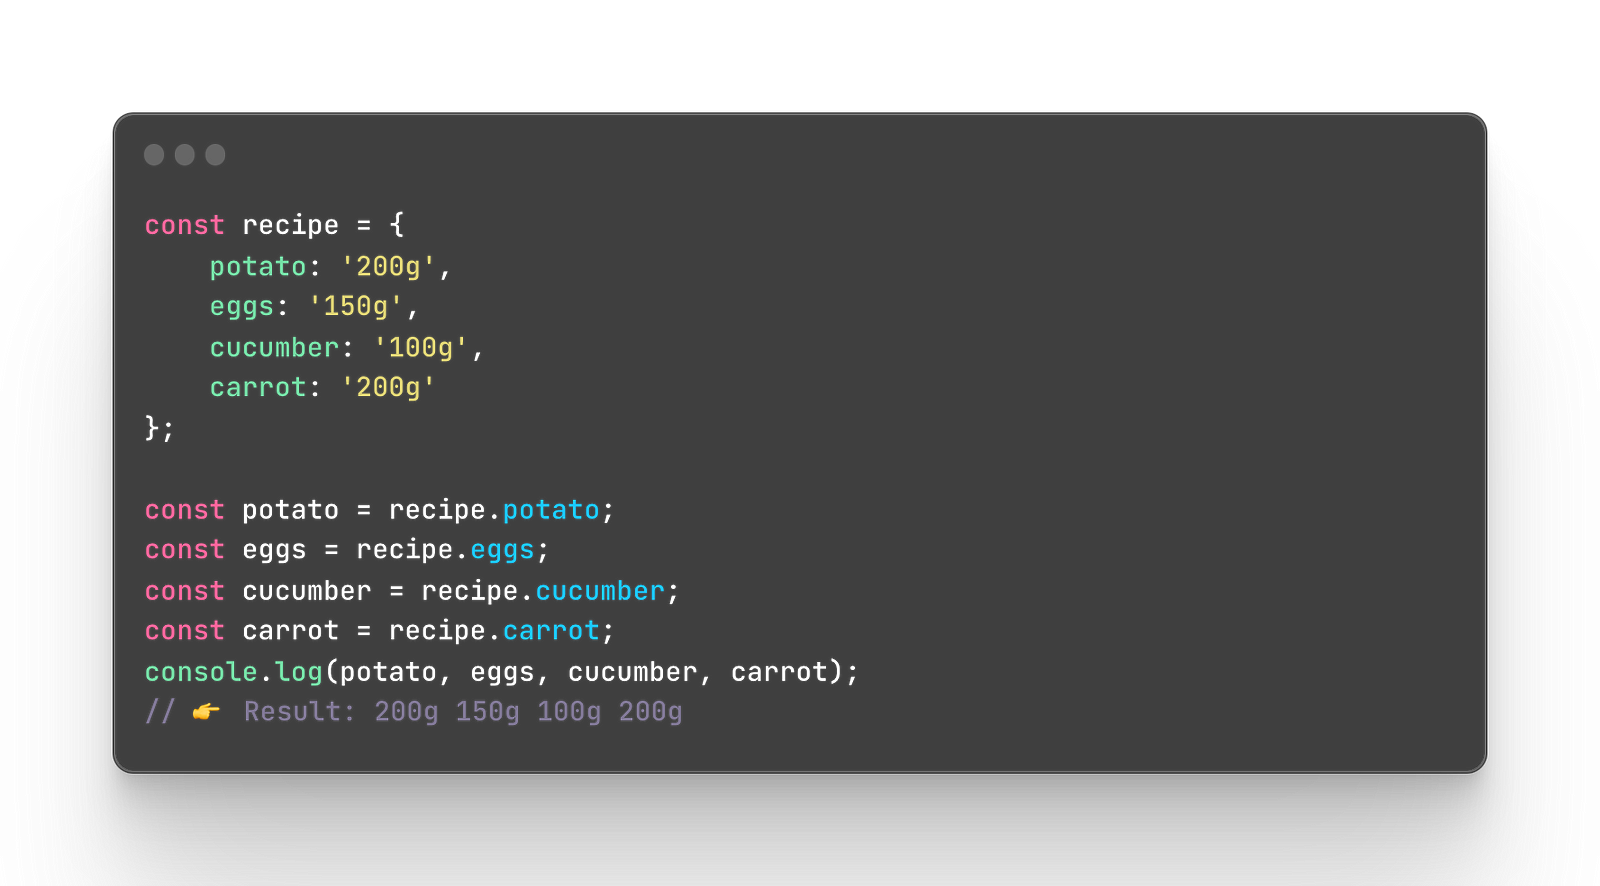
Let’s say we have a recipe with some products and we want to have each of them in a separate variable. This is how it was done before ES6. We simply retrieve each property one by one.
The modern way
And this is how it should be done in a modern way where four lines are replaced just by one thanks to modern destructuring. You retrieve properties in one go without the need to repeat so much code. It’s important to remember that the key name should match the one you use during destructuring because if you don’t, it will return undefined. This doesn’t happen in the case of the old method though and you can use any name of the variable there.
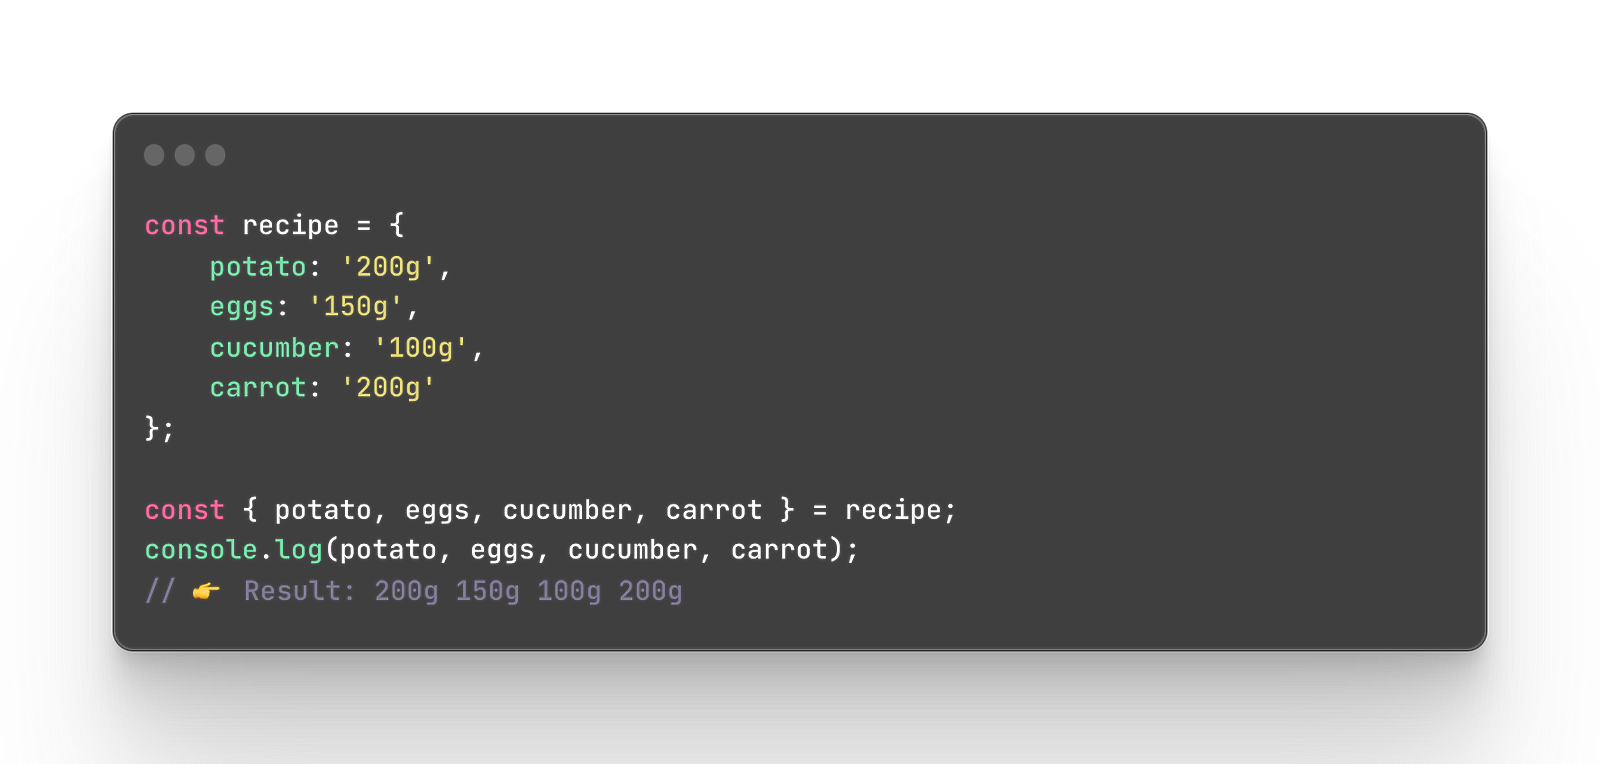
As you see yourself, the second method is much cleaner, faster, and easier and that’s why it’s much better as well.
Aliases
As I mentioned above when using the modern way of destructuring you cannot use any name and it has to match the key name in the object. To avoid this you can create use an aliasing feature. Alias is an additional name for someone or something, it’s the same as the word aka (also known as). Here is an example of how to use aliases.
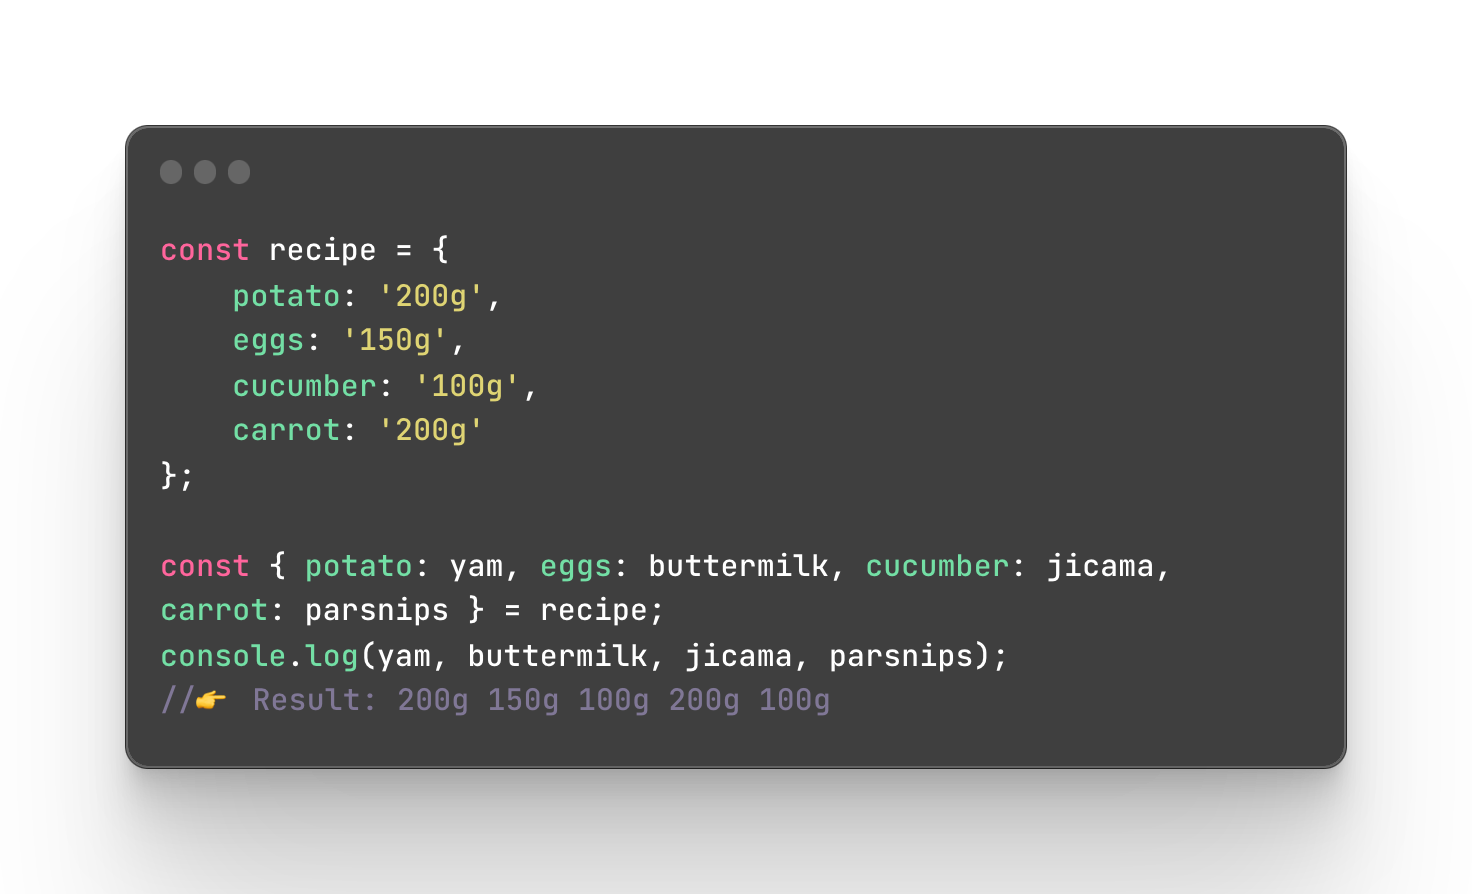
I replaced every single key name with a different name so if you do not have any of them, you can replace it with something else.
The rest operator
There is a method that you can use if you need to retrieve just several properties but you also want to save the rest of the properties separated from the ones you saved in a variable. This can be done with the help of the rest operator and as the name suggests, it bundles the rest of the properties into an object. To save the rest of the data into an object, you can simply write any name of a variable where you want to bundle them up and write three dots (…) at the start of the variable.
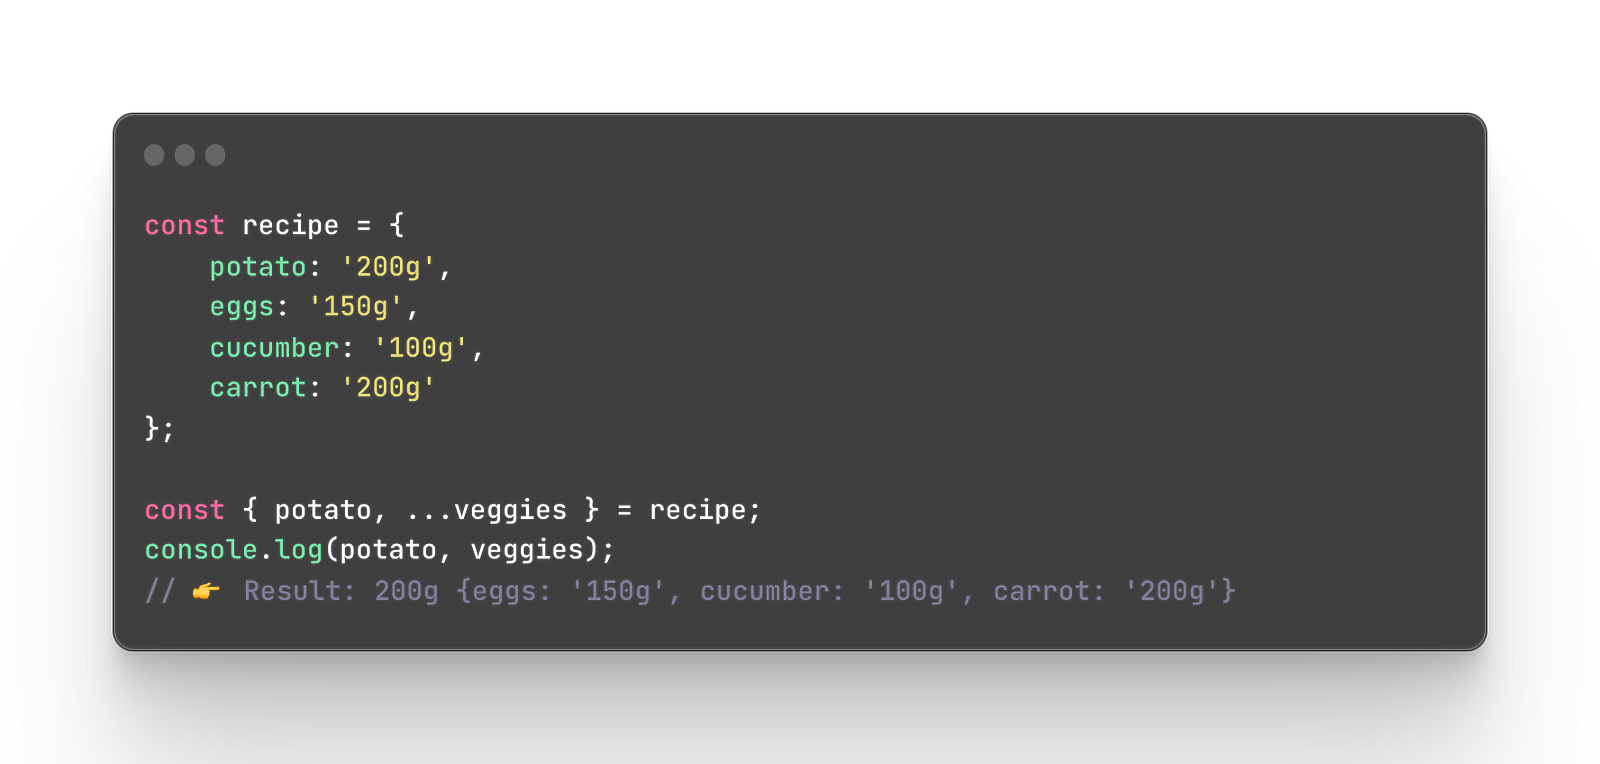
The rest operator can be used even if you have just one item left or if you have none. Then it will return an empty object.
Default values
During destructuring, if the property doesn’t exist it will return an undefined. However, to prevent an error you can also set a default value that will replace the undefined. For example, we have the same recipe and we want to retrieve a property that doesn’t exist there now and might appear later. To avoid errors we can set a default value for the new ingredient that doesn’t exist now but might appear later.
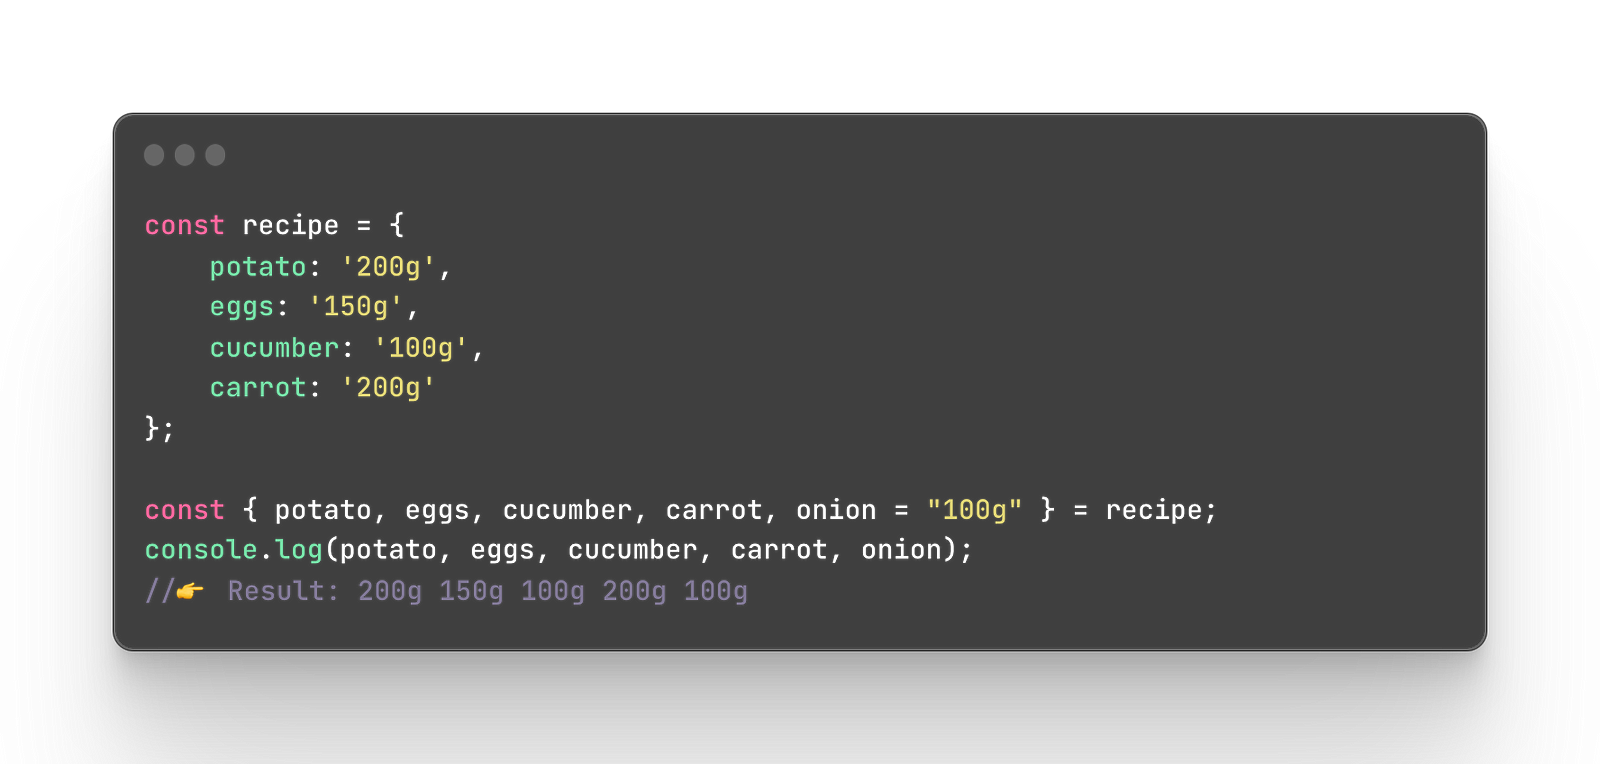
As you can see, I added an onion property in the destructuring even though it doesn’t exist in the recipe object yet. I added a default value of 100g so unless the onion appears with some value in the object, it won’t throw any error and the default value will be used.
Built-in objects
JavaScript has various built-in objects. Built-in means that it’s a predefined object that already exists so you don’t create it from scratch. String, Array, or Date are all built-in JavaScript objects often mentioned as Standard built-in objects. I am not going to cover each of them in detail at this moment however if you are interested you can read more about it here.
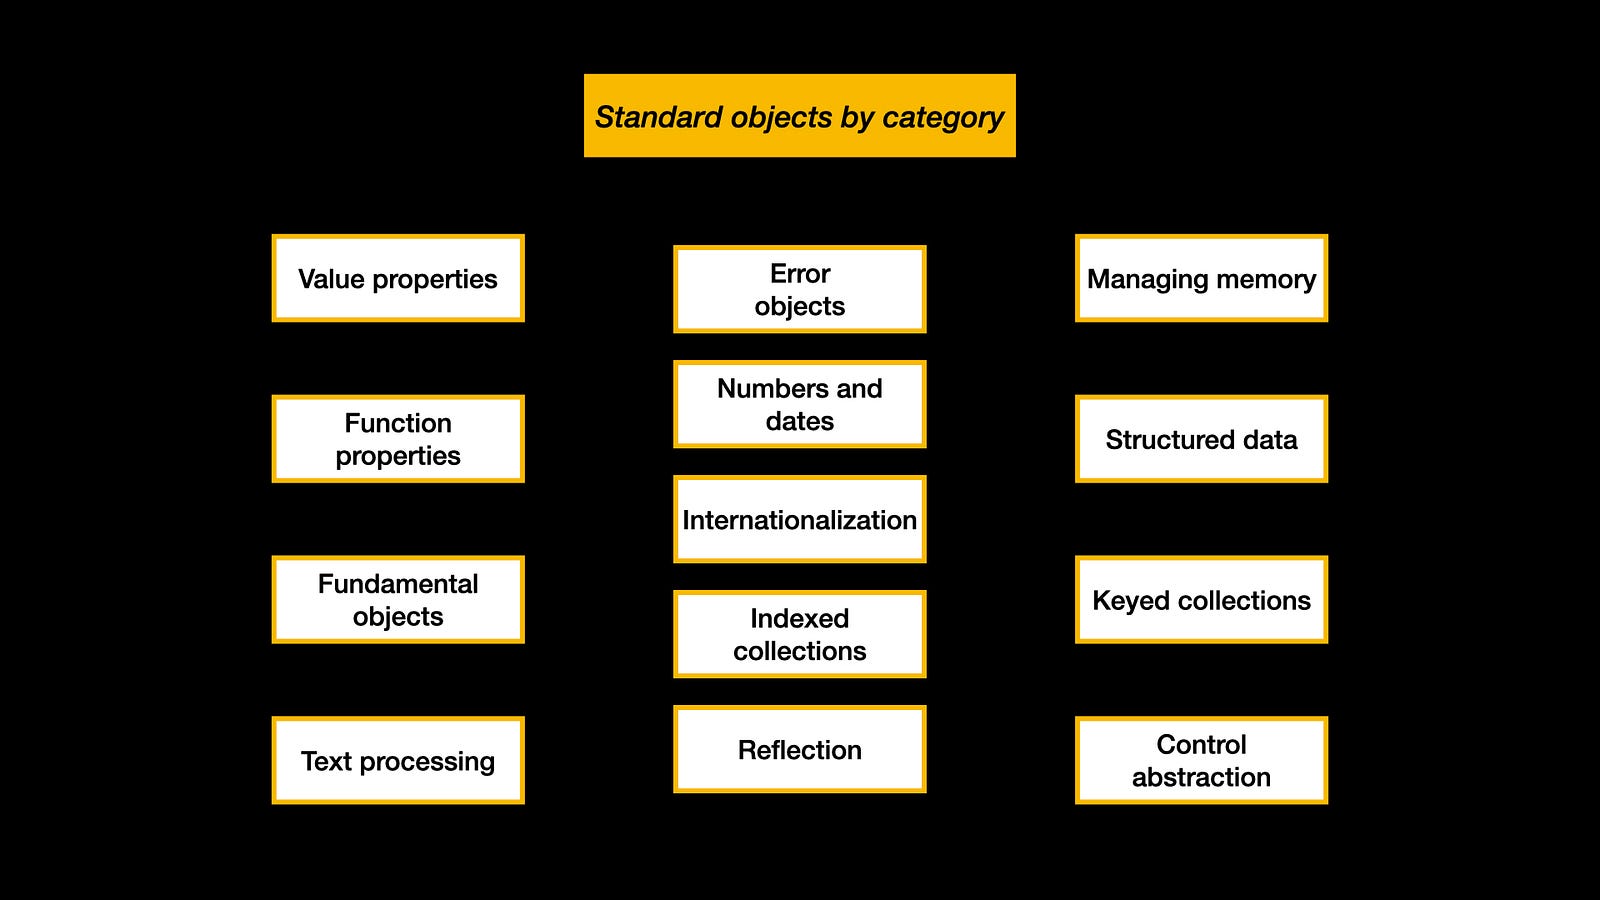
Standard objects by category
1. Value properties
2. Function properties
3. Fundamental objects
4. Text processing
5. Error objects
6. Numbers and dates
7. Internationalization
8. Indexed collections
9. Reflection
10. Managing memory
11. Structured data
12. Keyed collections
13. Control abstraction objects
Summary
We went through the concept of objects in JavaScript, which are similar to real-life objects with their properties and methods. Objects contain key-value pairs called properties and hold functions called methods. They are also capable of inheriting features from one another with the help of prototypes. Prototypes are objects themselves with various built-in properties. JavaScript objects can be chained with prototype references that lead to the parent object. The prototype chain ends when the prototype’s prototype is null. The article also provides examples of creating a new object from the main object and explains the significance of the prototype chain.
